Saturday, July 27, 2013

Efficiently Sewing a 9-Patch

The great thing about baby quilts is they are small and quick to make.   I made a 39" x 39" top in two hours yesterday, using an efficient method of sewing 9-patch blocks. 
The blocks were re-cut using the Disappearing 9-Patch tutorial to create the D9P pattern.
But more on sewing those 9-patch blocks!

I dove into my nickel (5" x 5" squares) bin, happy to be using some more up!  Then grabbed some white fabric, and a dark pink for the centers.  Cut those two into 5" squares, then arranged all squares in piles for easy sewing.
Now to the machine for the efficient 9-patch.  One block is sewn at a time.  

Starting on the top row, pick up the top left square and sew a white middle square to it. DO NOT CUT THE THREADS!
Moving to the next row, pick up a white square (position middle left) and sew the center dark pink square to it, making sure the white square is on the bottom.  Again, DO NOT CUT THE THREADS.  This is chain sewing top to bottom.
Sew the bottom left pink square to a white square, and this time, CUT THE THREADS.  Three rows for one block.
Starting on the top row again, sew the top right pink square to the white square from the first sewing.  DO NOT CUT THE THREADS.
In the above picture, the top left square is on the left, and the top right square is being sewn to the middle white.  The arrow points to the threads linking the next row.

Open up the next row, sewing a white square to the middle dark pink.  DO NOT CUT THE THREADS.
The arrows in the above picture point to the chains linking the rows together.

Finally, open the last row, sewing the bottom right pink square to the bottom middle white one.  CUT THE THREADS.  This is one block.
The beauty of sewing a 9-patch this way is that the pieces stay in order and the whole unit can be set aside in one piece so that another can be sewn.  When all units are ready, take them to the ironing board for pressing.
Pressing follows the standard 'press to the dark side'.  By doing this, the seams nest when sewing the rows together.  Once pressed, and still not cutting the threads that link the rows (shown at the arrows), turn the top row down, nest the seam and pin. 
Move that row out of the way, turn the bottom row up, nest the seams and pin.
Now all the blocks are ready to be chain stitched, stitching down one side of the block, one right after another.
When one side is done, chain stitch the other side.  Cut the blocks apart and press open.  Ta da!  A really fast, efficient way to turn out some 9-patch blocks.
I said above that I re-cut these to make the Disappearing 9-patch.  I put the resulting blocks together in the following setting
but I also came up with this
I liked this one just as well and think it would look terrific for a bigger quilt.  I'll keep it in mind for another day!

Happy Quilting!


Friday, July 19, 2013

Nickel 2 is Done!

Finally got to finish up Nickel 2 yesterday!
Still have to do the binding, but at least it's off the frame!

Here are some detail pictures


Now, I have to admit, that while the quilting is pretty, it's probably a bit too much.  If I were to do it again, I don't think I'd put the zigzags in the blue stars.  Leaving just the 1/4" border on the inside of the star would have been fine.  Live and learn!

Here are some closeups
In the center above is a star I learned from Kim Brunner's Machine Quilting with Templates at Blueprint.  Though it's a nice design, it got lost with the light blue thread.  So I went over it with a dark blue.  Better, but still gets a bit lost.
This looks really pretty in the quilt and repeats the border.  (Sorry about the wiggle--shame on me!)

And of course, the back.
Now, just what I'm going to do with this quilt, I don't know.  I may save it as a teaching sample, or then again, I might just donate it.  Or hang it for a while. 

Anyway it was a great time practicing freehand and ruler work, so I guess I got what I wanted out of it!

Happy Quilting!


My DIY Sewing Table

Updated 6-2020

So excited to share my DIY sewing table! Using an Ikea Ingo table, a few extra nuts, bolts, and wood plus the necessary tools, the instructions below made it an inexpensive and easy way to have a sewing machine seated in a table, making the bed flush with the table surface - every quilters dream! 

Ikea Ingo table for a sewing machine

The original source for the sewing table construction was from a site called From Marta With Love, but with added tweaks and additions along the way. Follow along for instructions to make an inexpensive sewing table, complete with knee lift!

Supplies

  • Ikea Ingo table or other table with edge support rails under the top
  • 3/4" plywood support board, 2" wider and longer than the sewing machine
  • a 2x2, at least 56" long
  • jigsaw
  • miter or hand saw
  • jig kit
  • medium grit sandpaper 
  • drill with a 1/4" bit and a countersink bit
  • clamps
  • (4)  1 1/4" wood screws
  • (4) 4" long 1/4" diameter bolts with threads at least halfway up the bolt
  • (8) washers and nuts to fit the bolts
  • (4) bolt caps


Placement and Cutting

Assemble the Ikea Ingo table, but don't fully attach the table top. 


Ikea Ingo table unfinished

Measure in from the table top edge to the support rails at both the front and the right side. Add the width of the support rails to this measurement. Transfer these measurements to the front right corner of the table top, again from the edge, with several small marks. Also mark where the bracket attaches. These marks will help in machine placement, preventing rail interference.


Place the sewing machine on the table top, avoiding the rail marks. There are no hard and fast rules for sewing machine placement - it's more of a personal preference of what's a comfortable sewing distance. For my table, I marked my Janome 6500 footprint at 3" from the front and 3 5/8" from the right side, leaving 24 3/4" on the left. I want as much room as possible on my left!

Ikea Ingo table showing sewing machine ledge

Note: If you do slide the machine far to the right, the added right support rail underneath will have to be modified as it will probably hit the corner bracket. Do this only if you are comfortable making adjustments to that rail. We made the rail shorter (see the open space in the corner above), then added a third support rail along the back of the opening, putting two bolts there, and only one on the right side. All total, we used five bolts to support the machine.


Once positioning is determined, trace around the footprint of the sewing machine, making sure to leave enough space to accommodate the cords. My 'opening' is approximately 1/4" bigger than my machine, which also helps getting the machine in and out.


sewing machine tracing and hole cutting


Remove the table top from the legs, placing it on a supporting surface to cut the hole. Drill a large starter hole inside the tracing, near an edge for easy insertion of the jigsaw blade. Then cut, using a wood blade, carefully following the drawn line and going slowly around any curves.

After cutting, check the machine's fit in the hole and make any adjustments. Sand the edges, and use wood filler if necessary on any mistakes or wood chips. Reassemble the table, but don't tighten anything yet.

Supports

Flip the table onto it's top, with legs in the air. Measure between the front and back rails - for the Ikea Ingo table, it should be 26". Cut the 2x2 at this measurement for 2 pieces.

On the back of the table top, measure 2" over from each short side of the hole, marking a line from the front rail to the back rail. These are guides for attaching the 2x2x26 pieces.


support rail placement and bolt placement for the sewing table


Using a jig kit, drill 4 pocket holes (one on each end of each 2x2x26) for the 1 1/4" wood screws.

drilled pocket holes

Place the outer edge of these pieces on the drawn lines (they are placed between the hole and the line) and screw in place to the rails. 

Mark the bolt positions on the new support rails, approximately 1" down from each long hole edge, avoiding the wood screws on the ends. (Refer to drawing above).

Remove the table top from the table frame, and legs still in the air, drill 1/4" holes all the way through the 2x2's. Flip the table frame over, and countersink the tops of the holes. Test that the bolts fit in the holes, and that they don't stick out on top. 

Remove the bolts, and turn the table frame over again. Place the 3/4" plywood support board under the frame, centering it within the hole/bolt/support framework, with equal amounts of overhang. Using the drilled holes as a guide, drill small pilot holes into the support board - don't drill all the way through! Remove the support board and continue drilling the holes through the board.

Assembly

Place the table on it's legs, and put the bolts through the holes, checking again that they are countersunk enough. Place the table top on top, and reattach the top to the frame per the Ikea instructions. The bolts should be hanging through the support rails.

Attach the 3/4" plywood support board underneath, using the following hardware sequence:

                   nut  --  washer  --  SHELF  --  washer  --  nut

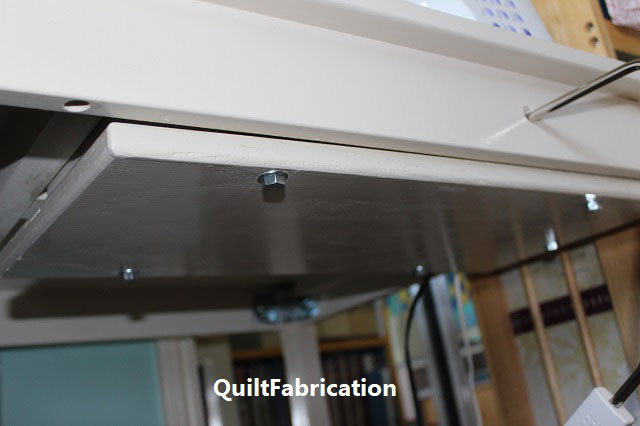
Ikea Ingo sewing table with knee lift hole


Tighten both nuts, and use them to adjust for level of the support board after inserting the sewing machine. Tighten/loosen until the machine bed is level with the table. When all's good, add the bolt covers to lessen injuries. Bring the cords up through the hole, attach, and done!

DIY Ikea sewing machine table


To make this extra special, drill a hole for a knee lift.

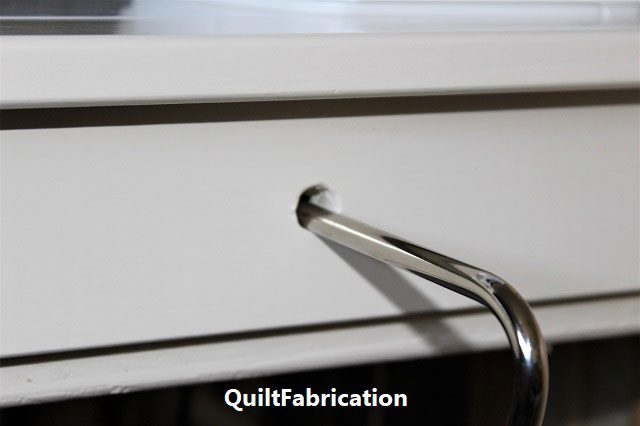
DIY Ikea sewing table knee lift hole


Unfortunately, I can't tell the exact spot for that, but I recommend measuring from different areas on both the machine and the table to determine where the knee lift hole is. Then drill a 5/8" hole, bigger than needed, in the front support rail to insert the knee lift bar.

DIY Ikea sewing table with knee lift hole


And for added table stability, since sewing machines produce a lot of vibration, use a few more 2x2's as support bars between the legs. Check them out in the picture below.

DIY Ikea Ingo sewing table with extra leg support


So with a bit of extra wood and some time, I've now got myself a sewing table with a set in machine, for under $125.  Awesome! 

Happy Quilting!


 Follow on Bloglovin


Tuesday, July 16, 2013

Two Things That Make Quilting Easier

Today I'd like to talk about two basic skills that all quilters should master:  the 1/4" seam and pressing.  I bring this up because of a swap block I received that was poorly put together, and really stuck out amongst the rest.  I won't show the entire block, as I don't wish to embarrass this person because I don't know her circumstances.

Here's what makes this block a problem block:
a larger than 1/4" seam
and seams that are not pressed consistently.
Unfortunately, attempting to match the seams created a pucker due to the large and inconsistent seam allowance.
Now, how to get a consistent 1/4" seam.

First, cut two 2 1/2" strips for testing.  If your machine has a foot with a 1/4" guide, use it.  Otherwise, use a stack of post-its, sticky back foam, or some other fabric guide that can be set 1/4" away from the needle.
Foot with a 1/4" guide


Post-its to act as a seam guide
In the above photos, my needle is set to make a SCANT 1/4" seam, meaning I stitch a bit closer to the edge of the fabric.

With the two fabric strips, sew a 2" long scant 1/4" seam.
Press the seam to set it, then press the seam to one side, preferably the dark side.  Place a square ruler on top, measure from the edge to the seam, then from the seam to the other edge.  

With the scant 1/4" seam, my test piece measures 2 1/4",
2 1/4", and 4 1/2" overall, like it should.  If yours does not, keep adjusting your needle placement or your guide placement until you get that scant 1/4" seam.

Now for pressing.  Press, do not iron!  Pressing means going up and down with the iron, not side to side.  And always press the seams to the darker side, and be consistent.  That way, when joining blocks, the seams will nest, creating perfect matches.
Try these techniques and I'm positive you'll see an improvement in your piecing, and an elimination of a lot of frustration.

Happy Quilting!
 

Monday, July 8, 2013

One Down, One to Go!

The heat wave has abated somewhat, allowing for some quilting. Yeah!!  Maybe this quilt should have a more heat related name, but for now it's Nickel 1.
Unfortunately, that nickel bin didn't diminish at all, yet this quilt still used 192 nickel squares!  

Now for the quilting. This is a rather busy quilt, but I didn't want to slap a pantograph design on it. I wanted a challenge! 

I liked the blue in this quilt, and wanted to bring it forward and push the yellow back.  So how to do that?  Well, I kept reminding myself that the way to make the design 'pop' is to quilt densely around it.  But I had some reservations.  Mainly, I didn't want to spend umpteen hours quilting this quilt because a) it's difficult to see detailed quilting designs on such busy prints, b) I'm not overly fond of it, and c) I'm probably going to donate it.  Trying to mesh all of these factors was more the challenge than figuring out the quilting design!

Here's the final quilting choice:
Stitched in the ditch around most of the blue, then a line a 1/4" in.  Small blue squares just have arcs.
Large yellow areas are filled with a medium stipple.
And small yellow squares are filled with back and forth lines  and arcs to add interest, since filling all the yellow with stippling would have been boring.

Here's the back:
It's hard to see in this picture, but the straight line quilting is in blue, and the stippling in gold, the same as on the front.

Nickel 2 is up next.  I like this quilt a lot more than the other, so this one might get a bit more quilting.  We'll see!

 Gone quilting!