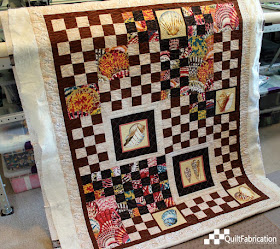
Her top is based on the Nine Patch Pizzazz (affiliate link) book by Judy Sisneros,
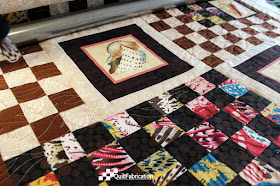
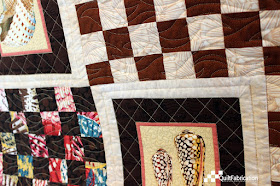
and when we talked about the quilting for it, I suggested using a pantograph in most areas, with some custom quilting in the seashell blocks. She said, "Go for it!", and I must say, the quilt turned out FANTASTIC!
For all the non-computerized longarmers out there, here's a tutorial on how to insert custom quilting into a pantograph design.
For this quilt, the pantograph Ebb and Flow was chosen,
as it has a lovely, repetitive wave design. Yes, the waves could have been free handed, but regular repetition was what we were after.
After deciding what areas receive custom quilting, in this case, the six seashell blocks, the quilt is loaded onto the frame. The first step involves stitching-in-the-ditch around the seashell blocks, then stitching as much of the pantograph as possible without running into those seashell blocks. And now the fun begins!
Blocking out the custom quilting area
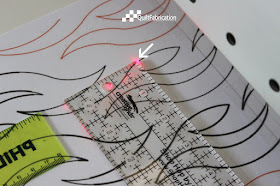
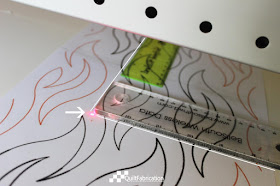
Remembering that the laser pointer on the back of the machine represents where the needle is, the needle is moved to a corner of the block. Note: what's shown is the lower corner of the block, since the top section is already done.
Keeping the needle in position, at the back of the machine
place an item to mark the laser point. I have rulers that I use, but you could use paper, tape, or sticky notes.
In the picture above, the arrow points to the laser dot, representing where the needle is, and thus the corner of the block.
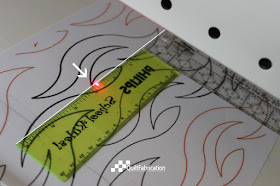
Moving the machine along the block edge
gives another spot to mark on the pantograph in back.
The drawn white line marks the bottom of the block.
Moving to the corner,
makes another spot to mark on the pantograph in back.
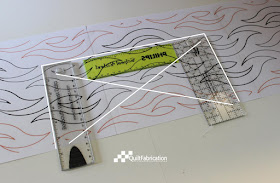
The sides of the block are checked in the same way, to make sure the ruler guides are straight, and not angled. The pantograph now looks like this,
with the white lines marking out the block, and the X meaning "don't quilt here!"
Quilting around the custom area
The pantograph is set up, the block area not to be quilted is marked, and everything is set to go! I will give you fair warning: this technique involves a lot of moving between the front and back of the machine. Just think of it as extra exercise, with the result worth it in more ways than one!
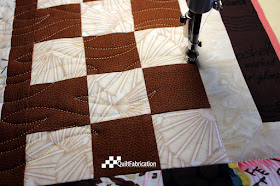
Starting the row as usual, the pantograph is stitched out, stopping until it comes just shy of the ruler.
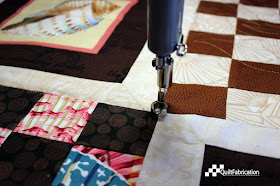
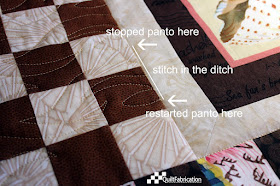
Moving to the front of the machine, a few stitches are taken to finish the pantograph line, and move the needle into the ditch.
Using ditch stitching allows for a continues line (no thread tie-offs! Yeah!!) to where the next pantograph line picks up in order to continue the pantograph back the other direction.
To figure out where I was in the ditch in relation to the pantograph, I stitched a few stitches from the front, then peeked around to the laser/pantograph in back to see how close I was to the next stitch line. Once there, I went around to the back again to follow the pantograph.
Continuing with this technique throughout the quilt, each time stitching-in-the-ditch around the seashell blocks first before stitching the pantograph, made for beautiful background quilting.
Custom quilting
Once the pantograph quilting is in place, the custom quilting of the squares happens. This is the place to have fun! Using more stitch-in-the-ditch, some cross-hatching, stippling, and detail stitching on the shells made for blocks that really popped!
My friend was so happy that this quilt went from ho-hum to WOW! with this extra bit of care and detail. She exclaimed, "You really made my piecing look good!", and with a comment like that, it was totally worth it!
Next time you have a quilt that could use a bit of extra WOW, try some custom quilting with your pantograph.
Happy Quilting!








This looks like a great partnership between the piecing and the quilting. Wonderful work.
ReplyDeleteThanks Ann! For this quilt, it was a perfect marriage
DeleteI got to see this quilt in person yesterday...lovely quilting.
DeleteThanks again Ann! I'm glad you got to see it!
DeleteAs I began reading I thought 'how did Susan do that?'and then came your great tutorial. Thanks for sharing how you did this. The quilting looks superb and certainly lifts this quilt to Wow.
ReplyDeletewow - great tutorial
ReplyDeleteThanks! Just sharing how to add extra punch to the quilting
DeleteThat looks wonderful and I appreciate the tutorial.
ReplyDeleteVery cool! I'll keep that in mind when I get a long arm one day. Thanks for sharing!
ReplyDeleteI, too, have wondered how that would be done. Seems like a pain in the you-know-where, but worthwhile for certain quilts. Thanks for showing the way!
ReplyDelete