Pages

Friday, July 27, 2018

Pinwheel Placemats

Welcome to my day of the Christmas in July Blog Hop, hosted by Carol at Just Let Me Quilt.

My project is this set of Christmas pinwheel placemats.


Pinwheel Placemats by QuiltFabrication

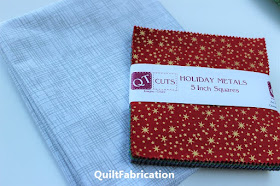
After purchasing this charm pack of glittery holiday fabrics, 


holiday charm pack

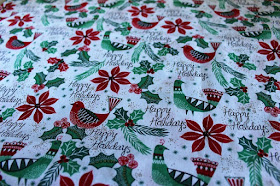
I paired it with this fun holiday fabric I found at JoAnn's.


holiday fabric from JoAnns

Being careful to stitch the HST's so that the print all "read" in the same direction,


careful placement of fabric so that it reads correctly

the pinwheels were finished up, and pressed with spinning seams.


spinning seams on pinwheels

Adding strips first to the right, then the top and bottom of the pinwheels increased the unit's size to 11" tall. With the addition of a background piece on the left, the placemats now finish approximately 14 1/2" x 11".


holiday Pinwheel Placemats
Aren't those super fun? I am so looking forward to using them later this year!

As for the quilting, I kept it simple. The background is quite busy, so no need to go overboard. Simple stippling does the trick, as does just one curving line to give motion to the pinwheel.


pinwheel placemat quilting

The backside is just as nice. There wasn't enough backing for all four, but with the addition of a red strip, that fun holiday print is all gone!


pinwheel placemat backside

And check out that neatly machine stitched binding - love it!


machine stitched binding

Happy Quilting!


Follow on Bloglovin

My Favorite Patterns

Wednesday, July 25, 2018

Yuletide Fir

Welcome to my day, which is the last day of the 12 Days of Christmas Blog Hop, hosted by Sarah at Confessions of a Fabric Addict.


Yuletide Fir by QuiltFabrication

If you are looking to link up to Midweek Makers today - it's totally my fault in the scheduling. Truly sorry! But no fear, Midweek Makers will be back next week!

So let's have a look at the Yuletide Fir, a modern style Christmas tree.

Made from strip sets of different greens plus a narrow background strip, triangles were cut using the tri-tool ruler (affiliate link). 


triangles with background

After laying out the pieces in a pleasing arrangement, the sewing began, one row at a time.


triangle layout

With the squared off point at the top, the triangles were super easy to sew together, as the proper 1/4" dog-ears happened at each end.


triangle sewing

Once the rows were done, they were sewn together, carefully matching points with a few test stitches before the whole seam was stitched to make the tree. 

The sides were made by carefully laying the tree on folded fabric to get mirror image pieces. Then the ruler is placed up against the tree to make the cut. 


Yuletide Fir background piecing

To give myself a bit of wiggle room, the side pieces were cut a bit bigger than needed, then the excess gets trimmed.


Yuletide Fir trimming

And every Christmas tree needs a star!


Yuletide Fir star

That star shines brightly, throwing out beams of light in all of the straight line quilting. 

Yuletide Fir light beams


The tree itself was stitched-in-the-ditch to let it to pop out of the quilt, with light beams continuing through the branches of the tree,


Yuletide Fir tree

and down to the ground past the trunk.


Yuletide Fir trunk
This tree would also look great with embellishment, such as clear or colored Swarovski crystals, or tiny buttons on the tree - maybe I'll do that in the future.                                                                                                     

Happy Quilting!


Follow on Bloglovin

Friday, July 20, 2018

Inset Circles

Woohoo! Starting another scrap project, parts of which were made last year, and now they are becoming blocks. 


Want to learn how to stitch these circles into a block, with no applique involved? It's easier than you think! And for an updated version, check out A New Round Robin and Inset Circle Tut. Let's get started!

First, cut both an over-sized background square for the block, and a same sized piece of freezer paper. I choose to have a 12 1/2" finished block, so I cut a 13" background square, allowing for trimming later. Fold it in half on each side, pressing to mark the center of the block.


block center

Since my unfinished circle is cut at 8 1/2" (finished will be 8"), I'll use an 8" circle template to mark on a same size piece of freezer paper. The freezer paper has also been folded on each side to mark the center.


freezer paper center

Carefully and smoothly cutting along the line,


cut out circle in freezer paper

the freezer paper is ironed to the wrong side of the background, lining up the centering marks.


ironed on freezer paper


Trim out the center circle leaving a 1/4" seam allowance. 


cut out circle with seam allowance

Clip the seam about every 3/4", then with a bit of starch, press the seam over the freezer paper edge.


seam allowance clipped and turned

Carefully apply some washable glue to the seam edge, 


glue applied to the seam allowance

then apply the circle with right sides to the glue. Press.


circle glued right side down

Now for the stitching. Carefully remove the freezer paper, making sure the glue bond in the seam allowance is secure. The stitching is going to take place in the seam fold of the background fabric, with the background on top and circle on the bottom.


releasing seam from freezer paper

Here's a closer look at that seam fold at the machine.


stitching in seam fold

I recommend shortening the stitch length a bit, and slowly and carefully stitch in the fold.


circle stitched to block in seam fold

When done, the seam can either be pressed to the inside, or left to lay toward the background. Either way, give that block a good press, and admire your work!


circle set in a block

Happy Quilting!


Follow on Bloglovin

Monday, July 2, 2018

Echoed Triangle Quilt Fill

Did everyone see the new pretty echoed triangle fill around the stars of the Salute runner?


Echoed Triangle Fill by QuiltFabrication

Isn't that gorgeous? Though this was quilted using a longarm machine, it can easily be stitched on a domestic machine.

There's two tricks to make this fill successful.

  • Only echo the triangle once.
  • Vary the direction of each triangle, not only in it's angle, but the rotation within the triangle. 


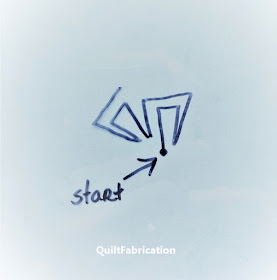
Let's look at the following drawings, which start with an open triangle that's echoed once.

first echoed triangle in the fill


Then a new triangle shoots off at a different angle, and a different rotation.

second echoed triangle with a different rotation direction


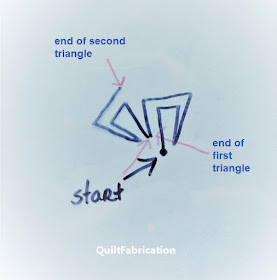
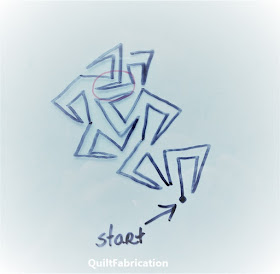
Here's the important part: to get where you want to go with this design, remember that the side the triangle starts on is the side the echo will end on.

where triangles stop and start in relation to rotation

If I had drawn that second triangle in reverse rotation, I would have ended up near the 'S' of start.

Then more triangles are added and echoed.

more echoed triangles

Sometimes, there may be areas that are a bit too thick. 

thick area to be filled

Just try to fill it in as best as possible.

large area filled

When the design fills the area, it will be hard to notice those funny spots. This one has another, but it's not glaringly obvious.

larger echoed triangle fill

Here's a video to see the design being stitched. It may be a bit hard to see because of the blue thread on a blue background, but now that you've seen it drawn, you should be able to follow along. And be sure to watch to the end, as I traced over the design so you can really see it.


I also suggest that before you sit down to stitch this fill that you practice drawing it on paper or a whiteboard first. Of course, practice before stitching any fill is highly recommended - it helps to set muscle memory, and trains your brain to stitch the design. And if you remember the tricks of the echoed triangle fill, it will turn out fabulous!

Enjoy your day quilting!


 Follow on Bloglovin