Pages

Friday, November 23, 2018

Mediterranean Rose in Progress

Mediterranean Rose, a quilt started over 6 years ago, is on the design wall today.


Mediterranean Rose quilt by QuiltFabrication

It's slow going at the moment, what with Thanksgiving and all, but at least it's sewn into rows. Just need to add the side triangles, then it will be a top. 

Working on this quilt, at this time, was meant to be - here's why:  I started this quilt as a hand applique project while on a cruise to the Mediterranean in 2012. This past Sunday, as I trimmed and sewed, Rick Steve's travel program came on PBS. And he was travelling to the Greek islands of Santorini, Mykonos, and Rhodes, all places we visited on that cruise. How wild is that coincidence???

My blocks are based on a design found in Vol 1 of Quiltmakers 100 Blocks, 


Quiltmaker 100 Blocks

#30, Full Bloom.


Full Bloom quilt block

The instructions for that block used wool felt, but I wanted to do mine in traditional cotton. And I just wanted to applique the flowers and stems, not the big leaf parts in the center.

So, redesigning this block in EQ to suit my vision of it, I instead pieced those big leaf parts by stitching set in triangles.


set in triangles 1

Thank goodness for freezer paper and glue to make this possible!


set in triangles 2
set in triangle back side
set in triangles 3
set in triangle front side
So my block looks like this,


Mediterranean Rose quilt block by QuiltFabrication
my redesigned block

with more points to the center leaf area, and also slightly different flowers.


Full Bloom block
original block

Maybe I didn't finish it because I was tired of it? Or didn't know how to quilt it? Who knows why I didn't finish it long ago. At least it's getting attention now, and should be done next week. It will be a lovely addition to red and green of Christmas decorating around the house!

Happy Quilting!


Follow on Bloglovin

Friday, November 16, 2018

Pond Ripples

Yeah! The guest bed now has a quilt to call it's own, which I'm calling Pond Ripples.

Pond Ripples by QuiltFabrication

Sorry I have no outside, full on, hanging pictures of this, due to the incredibly poor air quality we've had due to the Camp fire. An on the bed shot will have to do!

As larger version of the Becharmed baby quilt,


Becharmed quilt by QuiltFabrication

I'm pleased with how it turned out, given what I had to work with.

Turns out, my awesome background fabric was not enough to make the full 8 1/2" second side borders. Thankfully, though, I was able to squeeze out two borders that are 4 1/4" - it's that narrow third background border visible on the edge of the bed.


Pond Ripples third border

And I'm really ok with that, because I was going for some overhang on the edges, but not a lot. When quilts are really big, it's a lot to manage!

I've also discovered that this quilt is a brighter blue than what's in the room, and really makes the picture look dull. The blue we pulled out for the paint was in the bird's wings, and not the picture background. Oh well.


original fabric pull for Pond Ripples

But, on an upside, this quilt is terrific for stash busting - I'm thrilled it used up at least 9 yards of fabric from my stash! And 5 yards of that was one piece I had for the backing - the quilt gods were definitely smiling down on me!

Overall, I'm glad I tried a larger size of the Becharmed quilt, but in reality, the pattern looks better as a baby quilt, and is written as such. Not only is it a great stash busting quilt, but also a perfect pattern for the beginner quilter.

The Becharmed pattern includes written directions for quickly making those 4 1/2" 4-patch units from 5" charm squares without sewing a single 2 1/2" square using my Charming 4-Patch Fast, Fun, and Fabulous tutorial. What could be easier???

Almost forgot! I decided on the Jester pantograph for this quilt and no straight-line quilting or feathers as for the baby quilt version.


Jester pantograph

Jester pantograph closeup

And here's a picture of the back (plus that Seminole style minky blanket I'm trying to hide!). Both sides were quilted with a dark grey thread.


Pond Ripples backside

If you're in need of a fast, scrappy baby quilt, or just want to use up your stash, check out the Becharmed pattern.

Happy Quilting!


Follow on Bloglovin

Monday, November 12, 2018

A Larger Becharmed Quilt in the Works

I've started another charm (5") square project, this time a bigger version of the Becharmed quilt.


Becharmed Quilt by QuiltFabrication

Since having guests last week, I've decided it's high time I make a quilt for the guest bed. Normally, one of my kid's crashes there for the occasional stay, and the bed is usually covered with minky blankets. Both blankets have a Seminole style design on them, with one beige, the other red. Let's just say they don't fit the decor of the room.

I've been wanting a quilt for this bed for a long time, but couldn't decide on a pattern. I did know I wanted it to be subtle and fit with the room, not be the focus of the room.

The room is painted in a greyed beige and a purple-ish deep blue, colors that were pulled from the very large picture on the wall. Yes, we've had it for many, many years, and hubby likes it there. 


room with beige/dark blues

So, my first fabric pull was non-yellow/gold beiges, and purple-y blues, with some that had a bit of aqua in them.


beige backgrounds with darker blues

All fine and good, but the level of contrast is sky high! I want this quilt subtle, not screaming "Look at me!"

Pulling out the super dark blues and replacing them with blues that where lighter and brighter was better, but still too much contrast existed.

How about lighter blues instead of the beiges?? And staring me in the face in the bin was a large piece with circles on it:


light blue background with lighter blues

Now we're talking! The contrast is down, the colors blend into the room, and I'm going to see if I can make this work!


room with light blue and blues

It will be tricky, as the circle fabric has a chunk missing, but I'm going to try anyway. Maybe the quilt won't be as big as I want, but at least it will look better than those minky blankets!

And in case your wondering, that tree on the wall is a vinyl tree decal (affiliate link), and one of six. They are taupe in color, and on this wall, the tree looks beige, while the other five on the opposite beige wall, look grey. Super simple to decorate with! 


Follow on Bloglovin

Friday, November 9, 2018

Inserting a Decorative Flange

Got a quilt that needs a little something to snazz it up, but you don't know what? How about adding a tiny extra decorative flange?


Inserting a Decorative Flange into a quilt border

That's what I did within the border of the Pumpkin block table runner, making this project go from ho-hum to wow!


Pumpkin Applique Block table runner by QuiltFabrication

Notice this is within the border, not at the binding edge, which is the Piped Binding technique. The tutorial today is for placing a flange within the border or around a block with sashing.

And it's easy to do! Of course, on this project, I had to take off the outer border first after discovering how boring the borders were without the green flange. But what's a little seam ripping? Better to bite the bullet and make it right/beautiful, than to have a project that one is not happy with.

So, just how easy?

Cut narrow strips

For a tiny flange, approximately 1/8" wide, cut enough strips 3/4" wide. 

If the project needs a wider flange, use the chart below to determine the cutting size for the desired width:


Desired width of Flange
            1/8”
                1/4”
                 3/8”


Cut width of strips
            3/4”
          1”
                1 ¼”


Anything more than 3/8" doesn't need to be an inserted flange, and should be a wide enough strip to just be sewn in.

If needed, stitch pieces together as if making binding (on the diagonal) to get the necessary length for the project.


Press the strips

Then, carefully press the strips in half, matching the cut edges. This step is important, so take the time to match those edges!


cut and pressed flange strips for quilt border


Baste the flange

Carefully line up the cut edges of the flange piece with the cut edge of the project. Use glue if necessary to hold it in place. If the edges are not in line, the flange will narrow and widen on the project, which is noticeable when dealing with such narrow widths.

Baste the flange to the project (border or block), 1/8" from the cut edges.


quilt flange basting

Overlap cut ends in the corners - do not apply like binding and fold to go around the corner.


Apply border or sashing strip

Attach the border or block sashing strip, carefully stitching a 1/4" seam allowance after lining up the cut edges. 


applying outer border strip


This is another area where precision counts - a wavy seam results in a wavy flange. Take your time - no need to rush!

If you're feeling super confident, the flange and border/block sashing can be stitched to the project at the same time, eliminating the flange basting step. I, personally, would rather do it one at a time, so as not to risk the flange moving.


Finishing up

Once the border/block sashing strip is on, carefully press open that strip, exposing the flange and keeping it flat.


flange insert in border on Pumpkin applique table runner

When quilting, stitch-in-the-ditch in the seam of the flange/border or block sashing. If quilting on the free side of the flange, try not to catch it the quilting by lifting the flange up and out of the way, if necessary. Then admire your work!

Happy Quilting!


Follow on Bloglovin

My Favorite Patterns

Monday, November 5, 2018

Pumpkins for Pick a Pumpkin Hop!

Pumpkins! Who wants pumpkins?! Today is my stop on the Pick a Pumpkin Blog Hop hosted by Carla at Creatin' in the Sticks - welcome!


Pumpkin applique runner by QuiltFabrication

I'm just loving my new applique pumpkin block, made into a runner - so fresh and modern! Not only in design, but also in fabrics, cause I got the grey going here! 


Pumpkin applique runner closeup


Notice there's no white sashing in between the blocks. When they were on the design wall, I liked how my eye was teased by the shifting of grey/orange to orange/grey to grey/orange of the blocks. White sashing would have broken up that effect, so I opted to place it only in the border.

Also notice there's a thin line of green in between the white and orange borders. 


green flange on Pumpkin runner


I had both the white and orange borders on, and decided the runner looked boring. Off came the orange, the thin flange of green was inserted, and the orange went back on. I'll have a tutorial on how to make that flange as part of the border soon so you can try it on one of your quilts. (Update - see Inserting a Decorative Flange)

The quilting uses rulers and Scotch inch tape (affiliate link) to make those diagonal lines behind the pumpkins - the tape was a life saver!


quilting using inch marked tape


After stitching 1/4" from the applique, the inner parts of the pumpkin were left un-quilted to give the pumpkin a puffy, rounded look.


pumpkin block

This easy to applique pumpkin block pattern is available at Etsy - how about some other ideas for these pumpkins? 

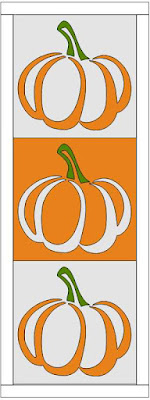
Stacked Pumpkins, as a wall hanging decoration


Stacked Pumpkin blocks

Nine Patch, for the wall or table


Nine Patch Pumpkins

Pumpkin Placemat


Pumpkin Placemat


A whole patch of scrappy pumpkins,


or maybe black and white.


Happy Quilting!


Follow on Bloglovin

Friday, November 2, 2018

7 FREE Patterns for Thanksgiving

Don't rush into those Christmas projects just yet - check out these FREE fall quilt patterns! With Thanksgiving only weeks away, let's say hello to fall. 


Charm Leaf runner from Anjeanette Klinder


Fall Mug Rugs from So Sew Easy


Tom Turkey placemat from Bee in My Bonnet


A Splash of Color leaf runner from Edyta Sitar


Applique leaf pillow from Positively Splendid


Autumn Road leaf quilt from Katie Doucette


Fall Placemats from Sewhooked


Enjoy your sewing for fall and Thanksgiving!