Thursday, February 21, 2019

Ladybug Dance

Welcome to my day of the Show Your Wings Blog Hop, hosted by Carol of Just Let Me Quilt. I have to admit, the theme of this hop puzzled me for a few weeks - birds? airplanes? butterflies? ladybugs? bees? What would I create with any of those 'winged' subjects?

And the answer is, a very sweet, adorable applique ladybug quilt called Ladybug Dance.

Ladybugs and flowers quilt by QuiltFabrication

The red from Valentine's Day had a heavy influence in my subject choice - who can resist ladybugs dancing among the flowers???


Ladybug Dance quilt by QuiltFabrication

This quilt is also bursting with playful quilting:
curlicues in the background,


Ladybug Dance quilting by QuiltFabrication

and a bit of petal shape repetition, done with rulers, in the border,


Ladybug Dance border

and the black binding to tie it all together.


In case you missed it, here's a video of the curlicue quilting:


Besides the backtracking, the secret to this design is to change the direction of the curl from the previous one, and to also change the size of the curls for added variety.

Along with the video, there's also a pattern for this cute quilt!
Made with very easy applique and piecing, the quilt measures approximately 39" x 39" - perfect as a baby quilt for that special girl, or as a wall hanging for the spring and summer.

Have fun hopping and be sure to grab your Ladybug Dance pattern!


Follow on Bloglovin

My Favorite Patterns

Friday, February 15, 2019

Mediterranean Rose Update

Hooray! The Mediterranean Rose quilt is almost done!


Mediterranean Rose quilting by QuiltFabrication

And it's about time too.

I think I loaded this quilt onto the Innova frame Sunday, February 3, and finally started quilting it on Tuesday, February 12. Wow! Nine days of just sitting there. Seems like a long time to me, though I know others have longer records out there.

The important point is, I finally started, mainly because now I need the quilt frame! The Show Your Wings blog hop quilt is pushing this one along, moving it from the design wall and then on to the frame. And now the blog hop quilt needs quilting. If I had zipper leaders, no problem - could have just swapped them out. But no, which means the time finally arrived to quilt the Med Rose.

I will admit to dragging my feet on it because I wasn't sure what to put in the background. I wasn't keen on SID around all that applique. The compromise? A small stipple within 3/8" of the applique, then becoming a peacock feather fill.


background quilting of a small stipple and peacock feather fill

Hard to see huh? Yep, a lot of work for quilting that just disappears - gotta love quilting on black. Well, at least if it does get noticed, it's pretty.

Yesterday, I set in finishing up the white areas with freehand SID around the applique (black arrows in the photo), 


freehand stitch in the ditch quilting

then a bit of straight line stitching (upper left of the photo below). The final touch will be to add some detail in the applique.


straight line stitching in the white background


Oh - here's a few hints for freehand SID around applique:
go at a slow, consistent stitch pace, and look ahead of the needle. Don't look at the where the needle currently is - look at where it needs to go. It's just like driving a car - you look where your going, not directly at the road in front of you.

That's your little nugget of quilting advice for today - have a great weekend quilting!


Follow on Bloglovin

Monday, February 11, 2019

FREE Valentine Heart Projects

Happy Valentine's Week! Need a project to send some love?


Here's a curated collection of FREE heart projects, from blocks, though place mats, wall hangings, and of course, quilts! Just click on the pink titles to go the instructions.

                                                   heart block
                                                     Nine Patch Heart

                                     
                                                     Love You Placemat

                           
                                                     Bursting Heart Pillow

                           e-heart_with_logo
                                                      e-heart Wall Hanging

                                               
                                                          Valentine Trio


                                               Scrappy Log Cabin Heart Quilt

                                             biglovehiresheader1.jpg
                                                              Big Love Quilt


                                                                 Love in Chains

                                                  Iheart7
                                                              I Heart Chevrons

Wow! That's a lot of love to send- enjoy!


Follow on Bloglovin

Monday, February 4, 2019

Cutting Setting Triangles

After languishing on the design wall for over a month, the Mediterranean Rose quilt has finally made it onto the longarm frame. I have high hopes for getting it quilted this week, though I need the design wall more!


Med Rose quilt on the quilt frame


This quilt has blocks set on point, which requires corner and side triangles to complete the square shape. So let's have a refresher course on measuring and cutting side and corner triangles for quilts with those on-point layouts, no matter if the finished quilt is square or rectangular.

In the picture below, the Side Triangles are in black (for this layout there are 2), and the Corner Triangles are in red (there are 4).


Side Triangles

The process below makes 4 (four) side triangles. Repeat the steps for more side triangles, or follow the Corner Triangle process to make just 2 (two).


To figure what size square to cut for Side Triangles, measure the short side of the quilt's side triangle area (in the blue oval), or use the finished block size of the quilt blocks. Personally, I like to measure, because fabric has a way of either growing or shrinking!

Multiply that measurement by 1.414, then add 1 1/4" (or 1.25). Round up to the nearest 1/8" (or add .125). 

Side Triangle Formula:
(side measurement x 1.414) + 1.25; round up to nearest 1/8 (or add .125).

Example: (10" x 1.414) + 1.25 = 15.39. Rounded up, I'd cut the square at 15 1/2" (15.50).

The next step is to cut the square on both diagonals, yielding 4 side setting triangles. I love this because it creates the straight of grain on the outside edge for the quilt.
straight of grain on outer edge

Makes 4 (four) side triangles


Corner Triangles

The process below makes 2 (two). Repeat the steps to make a total of 4 (four) for all the corners.


To figure what size square to cut for the Corner Triangles, measure the long edge of the quilt top corner, as circled in blue above.

Multiply that measurement by .707 and add 7/8 (or .875), and round up to the nearest 1/8" (or add .125) for the size square to cut.

Corner Triangle formula:
(corner measurement x .707) + .875; round to the nearest 1/8 (or add .125).

This time, cut the square on one diagonal, making a half square triangle unit.

straight of grain on outer edges of corners
Makes 2 (two) Corner Triangles

And there you have it - the math to make any size triangle for an on-point quilt.

Enjoy!


Follow on Bloglovin
Need more quilting tutorials? Check out the Tutorial page!

Friday, February 1, 2019

February 2019 Book of the Month

I've got a new Book of the Month feature, something of a departure from the quilts I've been making lately - it's time for Modern Art Quilts (affiliate link)!


Modern Art Quilts

Yes, I'm going to make an art quilt, something I haven't done in many months, and I'm pretty excited about it!

When I first saw this book, the element that jumped out at me was the black outline around the greys on the cover quilt, along with that little bit of overlap on each corner. That little bit really adds a special little spark. Who knew that something so simple could make such an impact?

Leafing though the book, several more quilts caught my eye, and set my mind whirling with creative ideas - here's some small snippets of a few of the other quilts in this book:


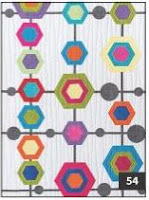
Hexi Network from Modern Art Quilts book
Hexi Network


Flower Power quilt from Modern Art Quilts
Flower Power


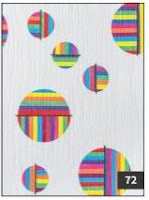
Going in Circles quilt from Modern Art Quilts
Going in Circles


Waves quilt from Modern Art Quilts
Waves

Fascinating, aren't they? Which would you choose? I think I'll start with a project from the book, maybe one of those above, then go on to create one of my own.

What's even more fun is that I won't be doing this alone - there will be a Modern Art Quilt blog hop of other creative quilters later in the month, with the schedule yet to be announced. I'll definitely keep you posted on both my progress and the hop schedule - I hope you become inspired to make your own art quilt too!

Happy Quilting!

Follow on Bloglovin