Friday, March 29, 2019

Making a Strip Pieced Sailboat

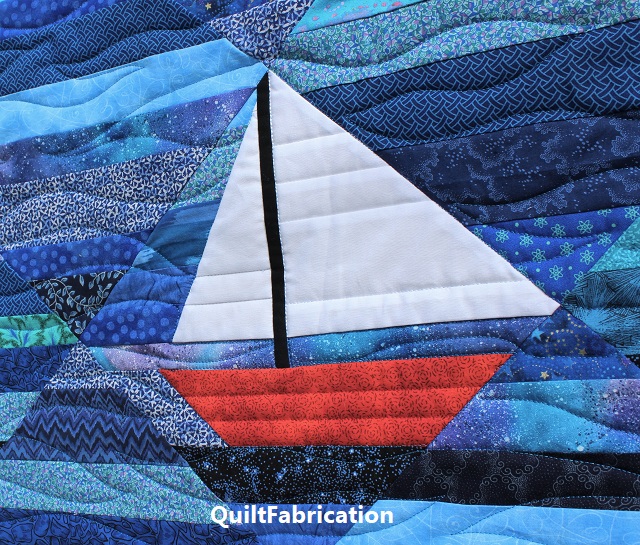
Today I thought I'd share how I did some improv piecing to make the sailboat in Seafarer. The full Seafarer pattern can be found on Etsy, in a baby, lap, and twin size.

improv string sailboat by QuiltFabrication

When making string blocks, a lot of quilters like to use a foundation upon which to stitch their strings to, mainly so they have a block outline to follow. I've done that before, using both paper, which I hated ripping out, and a lightweight fabric foundation, adding extra weight.

So this time, I decided to just wing it, and use a ruler as a guide. After each strip was sewn on, the seams were pressed to give me a better idea of how well I was filling the block space outlined by the ruler.


block size determined by the ruler

Some may think this is easy, rather mindless sewing, but not for me. Each strip in the block was planned out so that the appearance of large areas of either light or dark values wouldn't happen, causing a distraction. I find piecing string blocks to be just a challenging as any other block!

For the sailboat, I started with a darker ocean under the boat, as if it was casting a shadow.


boat and water complete with shadow underneath

After string piecing sails, the mast was placed with one side on the center line. From memories of my Dad's boat, I know that one sail is smaller than the other. With the help of a Tri-Recs ruler, the little sail is cut.


making the sails for the boat

And a corresponding angle is cut from ocean strips, to fill in the remaining block area on that side.


piecing the sail and the sea

Turns out, I didn't make the ocean strips long enough, so some of this set got replaced. But now I have two pieces with the correct angle to stitch together for the small sail side.


small sail for the sailboat

Before sewing it all together, it needs a quick check to see how it's coming together.


sailboat almost done

With a little bit of ocean to add in under the small sail, I can stitch it all together and trim, right? 

But the boat spanning the entire strip, from block edge to block edge, looks odd. The boat in this picture is close to what my Dad had,

                                     real sailboat
                                           
and the front of the boat does not go beyond the small sail. My boat needs some trimming! That's pretty easy - it's just like joining pieces together to make binding, double checking that the angle is right!


trimming down the boat

Ah, much better. Now to sew it all together, and trim, keeping the strips horizontal.


finished sailboat string block

Ta-da! Not bad for an improv sailboat, huh? Now it's ready to sail into the full Seafarer quilt pattern!


Happy Quilting Everyone!


Follow on Bloglovin

My Favorite Patterns

Monday, March 25, 2019

Seafarer

Introducing a new lap/twin quilt, Seafarer


Seafarer string quilt by QuiltFabrication


It's an ocean of string beauty!

The design for Seafarer, using the concept of strings to depict an ocean with a lone sailboat, was dreamed up at around 4 in the morning. Yes, I'm usually awake that early, either creating, or getting ready to go for a swim. 


sailboat block in the Seafarer quilt by QuiltFabrication


Scraps and yardage were pulled from the stash, and a few string blocks made to see if my vision was going to work. Below is the sneak peek of the beginnings of Seafarer that I showed before.


beginning ocean blocks for the Seafarer quilt

Still undecided as to whether this would be a baby quilt, or a bigger lap/twin size, I continued making more blocks, and adding the sailboat to the design wall.


more quilt blocks for the Seafarer quilt

Then it hit me - the reality that my son was leaving within weeks for a 27 month tour with the Peace Corps. Since he had already asked to take a quilt with him, Seafarer would be perfect for him - a lap/twin size it would be!

Since Seafarer was still in the works, he got to choose the batting, a soft 80/20, and also the backing. For that, I happened to have 4-5 yards of an aqua/blue flannel purchased years ago, just waiting for a water themed project. Perfect!


sailboat and flannel backing on the Seafarer quilt

Quilting was a fast and easy freehand wave design, done in around 2 hours.


freehand wave quilting on the Seafarer quilt

We had fun tossing around names for this quilt - my favorite from him was "Damn it, does this ocean ever end???"  But that's quite long, so we chose the more simpler, Seafarer. It suits his adventurous spirit, and the unknown experiences yet to discover. 

Will I miss him? Yes, but he's a young man now, ready to set off on an adventure of life after college. Twenty-seven months may seem like a long time, but it will pass quickly, and I know that an awesome man will come back. And ya, I'll miss the quilt too.

If you're also in love with Seafarer, the multi-size pattern is available in my QuiltFabrication Etsy shop.

Happy String Quilting!


Enjoyed this post? Don't miss out - get posts delivered directly to your inbox with follow.it.  

           
GET POSTS BY EMAIL


Follow on Bloglovin

My Favorite Patterns

Friday, March 22, 2019

More String/Scrap Blocks

How is it that scraps just never seem to disappear, no matter how hard we try to use them??? I spent 6 hours making 30 5" scrap blocks, and there wasn't even a small dent in the scrap pile.


scraps and small scrap blocks

I keep all of my scraps in color sorted zip lock bags,


zip lock bags full of scrap fabric

and there's still a ton left. I put the rotary cutter in the picture to give a size perspective, and even I was amazed at how large my scrap pile had grown again.

I had used some of the blues and aquas for the All About Strings project coming Monday, with this sneak peak I showed in an earlier string post.


blue and aqua string blocks

Of course, using scraps to make blocks is not new to me - I've done it several times. Last year, Regatta was one of my favorites,


Regatta Quilt

along with Saxon, which now has a new home,


Saxon scrap quilt by QuiltFabrication

and a favorite wall hanging for spring, Scraplicious Florabunda


Scraplicious Florabunda by QuiltFabrication

a Pinterest favorite for the quilting.


Scraplicious Florabunda quilting detail in the border

I've also written a couple tutorials on sewing string/scrap blocks using a foundation:
Making Fabric,
Playing For More Than 15 Minutes,
String Blocks for Hurricane Michael.

Or, I've been brave and not used a foundation, as for the blue/aqua string blocks, using only a 9 1/2" square ruler, 


string block in progress using a ruler

or just stitching pieces together to make this slab block, which got cut into four smaller blocks.


scrap slab quilt block

Of course, there are other scrap options if all of this seems like a lot of work (sometimes I think it is!). Check out Recycling Scrap Fabric the Easy Way if you're drowning in scraps, like I am!

No matter what happens to those scraps, have a great weekend quilting!


Follow on Bloglovin

Monday, March 18, 2019

String Quilts in Progress

Phew - I think I'm due for a vacation! The last couple weeks have been go, go, go for me and the sewing machine - we're both working overtime! It started with the Going In Circles quilt, then the Clover Field Runner, and the final finish of the Mediterranean Rose quilt

Now I'm off in a new direction, with a couple projects in the works using strings - here's a sneak peek of the first one.


string quilt project by QuiltFabrication

The top is almost done - I just need to figure out how to piece an important element within the confines of the 9.5" square. And no, I'm not telling what that element is - I'm saving that for a later post! And if it all works out, the big reveal of this quilt is next Monday, my day of the All About Strings Blog Hop, hosted by Creatin' In the Sticks.

The second string project hasn't gotten off the ground yet, and it will be a pattern from Bonnie Hunter's new book, String Frenzy (affiliate link). See what she started??? Strings and more strings!

Of course, string quilts aren't new to me as I've done several over the years. In 2018, Raspberry Cheesecake was my own curvy improv quilt design based on techniques from the book Modern Improv (affiliate link).


Raspberry Cheesecake by QuiltFabrication

And in 2017, Stock Market was my own design as a scrap buster, and is available as an intermediate quilt pattern in both a lap and twin size.


Stock Market by QuiltFabrication

Going back a bit further, to 2016, there's this easy baby quilt, A Quilt to Give, from Nancy Zieman's Quick Column Quilts book (affiliate link).


Quilt to Give from Quick Column Quilts by Nancy Zieman

There's more string quilts scattered throughout the years, but those are just a few of the highlights. There's still more to come with updates to all of my current string adventures throughout the next couple weeks - stay tuned!

Happy Quilting!


Follow on Bloglovin

Friday, March 15, 2019

Mediterranean Rose Quilt

It's taken almost 7 years, but the hand appliqued Mediterranean Rose quilt I designed so long ago is now finished, and quite ravishing on a dark background!


Mediterranean Rose quilt, dark background

I think this shot really adds to her captivating allure, versus the one below, which provides a different, less dramatic view.


Mediterranean Rose quilt, light background

Either, way this quilt is a beauty! And she certainly garners lots of quilt love each time I show an in-progress picture. And there were a lot of pictures, as I've been slowly working on the finish since digging her out of the closet sometime in late November. Check out the Mediterranean Rose in Progress post to see what I started with.  

Over the number of weeks of construction and quilting, I shared a few insights of what I learned in making this quilt. There's a simple math tutorial to learn how to cut setting triangles for on-point set quilts, and a quilting hint for stitch-in-the-ditch quilting around applique, at the bottom of that post. These are just little bits of information I share that make a quilter's life so much easier!

Now for some closeups. First, I have to say, a black background is not the most favorable color upon which to showcase quilting. Wanting more than just a stipple, I opted for peacock feathers, which fill the space. 


Mediterranean Rose peacock feather background quilting closeup

Mediterranean Rose peacock feather background quilting

See how much I had to angle the camera to get the light to pick up on the quilting? Anything more elaborate or structured just would not have been seen. And did you know black is a magnet for batting fuzz and cat hair? This quilt will need the constant attention of a sticky tape roller!

Though some may deem this a more traditional style quilt, I opted for a more modern quilting style in the white areas - my favorite: straight lines.


Mediterranean Rose line quilting


I think it adds a really nice contrast to all the other design elements in the quilt.


Mediterranean Rose straight line quilting

As for the backing, it's a white on black flower print that was in the stash, and works beautifully.


Mediterranean Rose quilting and backing

A couple more interesting tidbits about this quilt:

1)  it measures 57" x 57",

2) it is one of two hand applique projects I have done, with the other one yet to be completed,

3) the block is based on one from Quiltmakers 100 blocks, which was all applique. I changed some coloring, made different shaped flowers, and pieced pointy leaves cause I didn't want to do all that applique. Curious question: is it still the designer's block, or is it now mine??

4)  this was a hand sewing project I took on a cruise to the Mediterranean in 2012. With the flowers somewhat like roses, it was christened Mediterranean Rose a long time ago. It's also taken me that long to learn how to spell 'Mediterranean'!

For the next month or so, this quilt will hang in my dining room, so that I may see it every day and delight in it's finished glory!

Happy Quilting!


Follow on Bloglovin


Monday, March 11, 2019

Quilting a Custom Design

Today I want to share how I put together the beautiful quilting on the Clover Field Runnerin hopes that by seeing the design broken into parts, it won't be such a mystery and maybe a quilting style that looks possible for any project. 


Clover Field Runner quilting by QuiltFabrication

Looking closely at the quilting, it's composed of lines and stippling, easily accomplished on either a longarm or a domestic machine. It just comes down to creative design thinking around the quilt blocks, and then thinking through the quilting steps to successfully achieve the design. 

Let's start with my favorite design tools: a piece of vinyl, found at any fabric store, and a an Expo fine tip WET erase marker (affiliate link).

I used to use the dry erase markers, as they're easily found in most stores, but the ink is super hard to remove from the vinyl. Even with dry erase cleaner, the vinyl does not come completely clean. With the WET erase markers (affiliate link), removal only takes a spritz of water and a paper towel - so much easier!

So here's the vinyl laid over the quilt top, with the majority of the design drawn in. It becomes my reference guide while quilting. 


quilting design on vinyl

Important note when using vinyl and any marker: place tape on all edges of the vinyl to eliminate the chance of drawing on the quilt top. Yes, I have done that, and the marker did not come out. So, play it safe, and tape those edges!

My first step in quilting is to stabilize the quilt. This includes stitching down the edges of the quilt in the work area, and completing any stitch-in-the-ditch (SID) around borders and blocks. Once the SID is done, the quilting moves inside the blocks, here with the Irish chain design in the clovers.


SID and inner clover design

Oh yeah - sorry the pictures are not the best. Picture taking took a backseat to the quilting process!

The next step is to form the backbone or outline of the next major elements. Here, it's the two large squares around the four-leaf clover,


square outline

and the other smaller squares in the design. 


smaller square outlines

I always like to add a 1/4" outline stitch around elements, as it really helps the element pop. Here, it's inside the large and small squares.


quarter inch outline

Now comes the addition of one more design element, the triangles coming off the clovers. And from there, I can fill in the small area with stippling.


interior triangles and stippling

Being in the stippling mode, the other areas that need that motif are filled in.


stippling in other background areas

I could have stopped here and left the band around the square puffy, though it's a bit big in surface area. If left empty, the quilt could become 'wavy' because of the areas of really dense quilting combined with big empty areas. 
And that's not a good combo! Quilting should always be balanced, no matter the style.

The final finish is the straight line quilting, backtracking over previous stitching to fill in the area.


straight line stitching in an odd shape
See, it's really not that complicated when all the parts are broken into smaller pieces to quilt. It just takes creativity and planning, with a chance to grow those quilting skills.

Happy Quilting!


Follow on Bloglovin