Friday, August 23, 2019

Use It Up!

Finally, the Use It Up quilt from Accent on Angles (affiliate link) is a grand finish!


Use It Up quilt from Accent on Angles quilt book

Not only do I love the color combo and the quilting thread choice, but the size - a really nice 48" x 65" lap size.


Use It Up quilt from Accent on Angles

What started out as this fabric selection,


fabric selection for the quilt

worked it's way to strip sets with angled sashing pieces,


strip sets with angled sashing

then blocks, some of which were made in 95 degree heat requiring the assistance of a wooden iron,


wooden ruler

and the painfully tedious making of 164 HST's.

making HST's

The quilt picture in the book certainly doesn't look like it requires 164 HST's, 

Use It Up from Accent on Angles

and I probably would have thought twice about making this pattern had I read through it first. That could be my fault, but let's call this frustration 1.

Frustration 2 - this pattern needed serious editing. The beginning of the book, which goes over very thoroughly how to make the strip set/angled sashing blocks, is wonderful. 

This pattern however, had me cut too many strips for the strip sets, resulting in a lot of leftovers. Grrr. How did I discover this? Well, like Flower Joy, I thought I'd make up extra blocks for the back. 

30 additional blocks from excess strips

Which turned out to be 30 blocks, enough for another top. Use It Up only used 22. Grrr. Maybe cutting that many strips would allow for lots of variety? Anyway, just too many.

Frustration 3 - I followed the cutting instructions for the border pieces that are in addition to the HST's. And then I looked at the quilt diagram, which was labelled as to where those additional border pieces go. Turns out, the two did not match up, requiring the piecing together of a leftovers to get the right size border pieces. Grrr.

Once I finally got through all of that, a backing was pieced together with leftovers but no blocks, 

Use It Up quilt back side

and I was thrilled to finally get it on the frame.

Use It Up quilt on the frame

Now for thread colors. I could have gone gold, but it just disappeared. Then I found a gold with a green cast called Cleopatra.

Use It Up quilt with Cleopatra Glide thread

Not bad, though I kept searching, and found Split Pea, a correctly named color, and not one I would choose for just any quilt.

Use It Up quilt with Split Pea Glide thread

But Split Pea turned out to be the winner, really adding a beautiful sparkle to the Bluster pantograph on Use It Up.

Use It Up quilt quilting close up

With the extra 30 blocks, I plan to make one more quilt from the Accent on Angles book (affiliate link), though there are a couple other projects that need attention first. So, be patient, another quilt is coming soon!

Have a great weekend quilting!

Follow on Bloglovin

Friday, August 9, 2019

Watermelon Delight

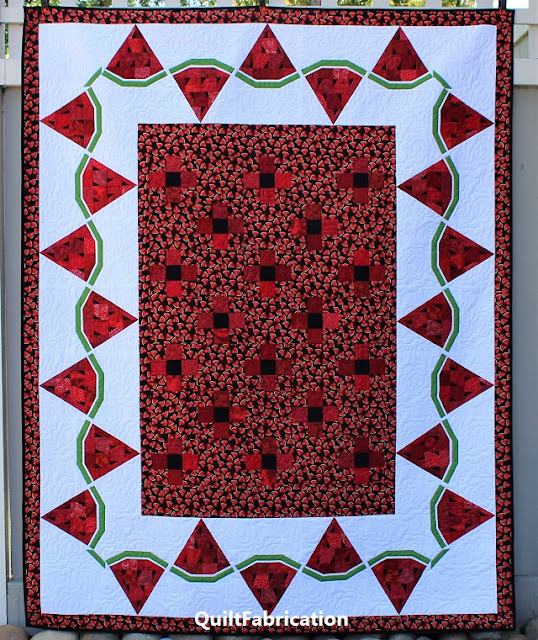
Wrapping up my celebration of summer with a new quilt pattern, Watermelon Delight!


Watermelon Delight by QuiltFabrication

This is my second creation with watermelon wedges, with the first being the Watermelon Twist table runneralso just as beautiful.


Watermelon Twist by QuiltFabrication


With Watermelon Delight, I envisioned a watermelon themed picnic quilt, 


Watermelon Delight by QuiltFabrication

full of a wave of watermelon slices in the border, ready to be picked off and eaten! And there's more watermelon to enjoy here, as these slices are slightly bigger than those in Watermelon Twist. The Watermelon Delight pattern has detailed instructions for making these bigger slices to form this undulating border. The pattern is also geared toward the intermediate quilter, as quilting experience is a must.


Watermelon slice border on Watermelon Delight

There's also the idea of watermelon fruit in the center, plus a few seeds of course.


Watermelon Delight center with seeds


And there's even red gingham on the back, adding more to the picnic feel.


Watermelon Delight backside

Quilting involved stitch-in-the-ditch around each watermelon slice, then stippling in each to outline the small seeds.


Watermelon Delight quilting closeup

The white background has the custom quilted pantograph, Pretty Paisleys, 


custom quilted Pretty Paisleys

which means the pantograph is not quilted through the slices, but around them. I blocked out portions of the pantograph with wedge shaped scrap paper, just as in my Pantographs and custom quilting tutorial. And yes, that took a lot of time, but I'm happy with the result.


pretty paisleys pantograph

And the watermelon fruit center and outer border is stipple quilted around the watermelons of the print. That way, the print isn't muted by the black thread. Plus, no use putting a fancy design on black fabric when it's going to be hard to see it. Ah, the curse of black fabric!


stipple quilting around in the watermelon print

Now that Watermelon Delight is finished, 


Watermelon Delight quilt by QuiltFabrication


I'm ready for a little outing this weekend, with a basket full of wine, cheese, a baguette, and of course, watermelon! Want to join me?

Happy Quilting!


Follow on Bloglovin

Friday, August 2, 2019

Watermelon Twist Table Runner

I'm all ready to celebrate National Watermelon Day tomorrow with my new Watermelon Twist table runner!


Watermelon Twist Table Runner by QuiltFabrication

Doesn't that make your mouth water??? These juicy red watermelon slices are set off beautifully on a light aqua background, then accented with stripes and tiny watermelons - so fun!

This is project number 1 that's made from my watermelon wedges, with project number 2 coming next week. Yes, two projects this year, cause these watermelon wedges are like potato chips - can't have just one! Last year, I celebrated with Whatamelon, a single, large watermelon runner,


Whatamelon table runner by QuiltFabrication

a pattern also available in my Etsy shop, along with Watermelon Twist

How about some closeups of Watermelon Twist's mouth-watering sweetness?


Watermelon Twist table runner closeup 1

For the background fill, I once again quilted my Straight Line Stipple, and added some curls in the juice droplets.


Watermelon Twist table runner detail

The watermelon seeds are outlined, but I chose not to quilt a fill in the watermelon slices so that they would stay puffed up against the background.


Watermelon Twist table runner closeup 2

And finally, there's a stipple fill around all the little watermelons, making them stand out.

For fun, here's a pic of the back, showing the Straight Line Stipple - check out the video on YouTube on how it's done.


Watermelon Twist backside showing Straight Line Stipple

I'm so excited to have this ready for tomorrow - and yes, I've got a watermelon waiting in the fridge!

Happy Quilting!


Follow on Bloglovin

My Favorite Patterns