Friday, October 25, 2019

Kimono Quilt

Another finish - the Kimono quilt, which turned out better than I expected, given all those charm squares in the border.

Kimono quilt

With such a variety of colors, those charms play nice with the all the prints in the kimonos. Thank you, members of the guild, for the kimono blocks so many years ago, now turned into a great quilt! And since this is made with contributions from guild members, it's only fitting that it go back to the guild's Philanthropy group, for distribution to someone in need.

Before it goes, how about a closer look?


Kimono quilt closer

The border is two charm squares deep, bringing the quilt's size to 63" x 83". Just look at all the color in the border!


Kimono quilt scrappy border

Here's another corner.


Kimono quilt 5 inch square scrappy border


Since this quilt is so busy, I kept the quilting simple, using the Paperchase panto, making it quite soft.


Kimono quilt paperchase pantograph quilting


And with yardage, charm squares, and scraps leftover, I managed to puzzle together a backing, knocking out the theme from my stash.


Kimono quilt backing

Just look at all that piecing at the end.


Kimono quilt backing closeup

This quilt is totally a scrap quilt, as even the batting is composed of pieces. Nice to have that out of the storage area too. This one was a win-win all around! If you're inspired to make something like this, check out the FREE Kimono block tutorial to get started.

Happy Quilting!


Follow on Bloglovin

Friday, October 18, 2019

Free and Easy Kimono Quilt Block

Who's got Asian fabrics in their stash? Wondering what to do with them? How about making kimono blocks for a quick and easy quilt??


easy Kimono block tutorial

I found a stack of these kimono blocks while looking through my stash.

Most of the blocks were made by fellow guild members years ago, and unfortunately, there weren't enough to complete a quilt, which is a bit of a draw back and probably why they were stored so long. 

After deciding on a layout, I needed to make up four more blocks. Having no instructions, I whipped out the ruler to get an idea of the size HST's needed, and thought I'd share a tutorial on making a kimono block.

The following instructions will make 2 (two) 9.5" unfinished kimono blocks, 9" finished. Make as many as desired!!


Kimono Block Instructions


Cut squares for HST's (half-square triangles)

From BOTH print and background fabrics, cut 1 (one) 7" square. 
Also cut 5 (five) 4" squares from each fabric.


7 inch squares for 6.5 inch HSTs
7 inch squares


4 inch squares for 3.5 inch HSTs
4 inch squares

Make HST's

Draw diagonal lines on all squares of either the print or background, whichever is easier to see.


draw diagonal lines
draw diagonal lines

Pair together a print and background square - 1 (one) 7" pair, and 5 (five) 4" pairs. Stitch a scant 1/4" on either side of the diagonal line.
stitch a scant 1/4 inch on each side of the line

Cut on the line, press seams open. This will help reduce fabric layer buildup when the HST's are joined together.
two HST squares
two HST's

Place a ruler's diagonal mark on the seam, and trim the large HST's to 6.5", and the small HST's to 3 .5". There are a total of 2 (two) 6.5" HST's, and 10 (ten) 3.5" HST's.


Assemble the Kimono Block


Follow the layout below for the Kimono block.


kimono block layout


Stitch 2 (two) 3.5" HST's together on the side, and 3 (three) together along the bottom, being sure to rotate the last HST.
Press seams open.

Stitch the pair along the side, pressing seam open. Then add the threesome along the bottom, again, pressing seams open.


kimono block half assembled


And ta-da -- a Kimono block!


easy Kimono block


Repeat as many times as desired to make your own Kimono quilt. 
Happy Quilting!


 Follow on Bloglovin

My Favorite Patterns

Friday, October 11, 2019

Frankenquilter

Say hello to Frankenquilter - created from a patchwork of parts, just as the original monster was.


Frankenquilter by QuiltFabrication

He's the perfect monster to help any quilter celebrate Halloween! 

Made for the Witchy Stitchy Blog Hop, hosted by Carol of Just Let Me Quilt, Frankenquilter has been haunting my head since July. Having finally collected all the parts, lightening struck to bring him to life!

Frankenquilter face by QuiltFabrication


His entire being is based on 2.5" squares, with pieced hair, eyes, nose, mouth, and neck knobs. Add in some quilting tools used in construction for good measure!

Frankenquilter quilt tools by QuiltFabrication


Oops! It looks as if the quilter isn't done stitching!

Frankenquilter stitches by QuiltFabrication


And so that no one forgets, or confuses him with his cousin, Frankenquilter wears his name proudly.

Frankenquilter lettering by QuiltFabrication

If you've fallen in love with Frankenquilter, either as this completed mini, or as just a block of his face for use in another project, an easy Frankenquilter pattern is available. Instructions/templates are given for either paper piecing or the flip n' stitch technique for block construction. Templates for all the quilting tools and lettering is also included.

Here he is, hanging out with other spooky friends.


Frankenquilter and friends by QuiltFabrication


One last note: some of the inspiration for Frankenquilter comes from my teenage years, when I got the chance to participate in a now-defunct live monster show at Universal Studios. Oh, how I loved dressing up in that makeup! Not sure if Bob, the Hulk look-alike, did though.

me and Bob at Universal Studios

Happy Halloween and Quilting, from me and Frank!


Follow on Bloglovin


Friday, October 4, 2019

FREE Fall Quilt Patterns

It's official - fall has arrived!  The calendar claims the First Day of Fall was Sept 23, and now that it's October, there's limited time to enjoy fall colors, quilts included. So how about 15 FREE quilt patterns to get in the mood?


The curated list below is full of a variety fall projects, from mug rugs, to pillows, to table runners, and quilts. Looking to add in pumpkins? 
See FREE Pumpkin Quilt Projects for ideas. Let's start with some small projects.

This cute Acorn Potholder from Therm-O-Web and Jedi Craft Girl,


and these fall mug rugs at I Should Be Mopping the Floor.

                                 Make these sweet fall Quilted Mug Rugs with this simple, step-by-step, photo tutorial.


How about some pillows for an easy seasonal decor change?

Modern Maple pillow from Orchard Owl Quilts,


Fallen Leaves pillows at C&TPub,


Scrap Buster Fall pillow from Cluck Cluck Sew, and


Applique Fall Leaf Pillow at Positively Splendid.


Now let's decorate the table!

Charm Leaf table runner by Anjeanette Klinder for Quilting Digest,


Autumn Table Runner at Quilter's Newletter, and


A Splash of Color runner from Andover Fabrics and Laundry Basket Quilts.


Oh goodness - the walls need some dressing up too! Check out these free fall wall hanging patterns:

Tumbling Leaves at All People Quilt,


Sunflower applique wall hanging at All People Quilt,


paper pieced Turkey wall hanging from Wisconsin Quilting, and 


Turning Leaves from Cloud 9 fabrics.


And last, but not least, quilts to snuggle under!

Scrappy Maple Leaf from Carter Quilter, and


Sweet Autumn from Anthology and Wendy Sheppard.


All of these are so inspiring! Time to go sew and enjoy those fall colors!

Happy Quilting!


Follow on Bloglovin

My Favorite Patterns

Tuesday, October 1, 2019

October 2019 Book of the Month

Here it is, October, and time to turn the page, literally, and move onto a new Book of the Month selection. This month's choice is Step-by-Step Texture Quilting (affiliate link) by Christina Cameli.


step by step texture quilting by Christina Cameli

Full of both freehand designs and those requiring a grid structure, this book has a bit of everything. I know I was happy to find it, as it provided some design ideas for a client's Halloween applique quilt. And ultimately, we chose two designs, Fog,


fog quilting motif

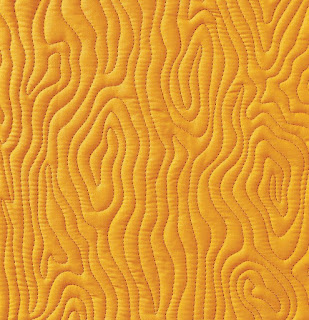
and Wood Grain.


wood grain quilting

Here's a sneak peek at some other quilting ideas from Step-by-Step Texture Quilting (affiliate link):

Topography, which I like very much,


Topography quilting

and the use of scale, which really makes an impact.


quilting scale

As for other ideas, well, you're just going to have to get the book - I know I'll be adding it to my bookshelf.

Update: here's sharing the quilting motifs on a client's quilt.


Fabulous, don't you think?

Happy Quilting!


Follow on Bloglovin