Friday, January 31, 2020

RSC 2020 January's Green

The scrap bin is overflowing again, so time to join in on RSC 2020 along with my fellow bloggers, just in a nick of time. I'll admit, the last time I participated in the yearly RSC (Rainbow Scrap Project), hosted by SoScrappy, was 2017, I got as far as March. 

But this year, I'm going to try to do better, stitching each month to use up some scraps, and complete the year. January starts off with green, either lights or brights - yes, I've got some of that! 

My plan is to make 12 1/2" pinwheels of each color, with extra 8 1/2" color blocks to have as backups at the end of the year.


RSC January green scrap pinwheels

Since I have no layout plan, the extra's will come in handy to fill in the blanks. And if I don't use them with the pinwheels, then I'll have blocks for another quilt. Wow - that would be awesome to make two quilts from scraps!

Wish me luck - maybe you want to play along???
Happy Quilting!


Follow on Bloglovin

Monday, January 27, 2020

Chicken Wire Quilting

Grab a 1/4" quilting ruler and head to the sewing machine - let's stitch some chicken wire!
Chicken Wire Quilting tutorial

Super simple to stitch, with just a marked grid and a ruler, what barnyard quilt would be complete without it? In this tutorial, I'll go over the stitching sequence first, followed by a video showing the stitching in progress, then a final discussion about scale. Let's get started!


Chicken Wire Quilting

Once the grid is set up, stitching starts at the middle of the left line of the first grid square (red dot), then down to the grid intersection. The stitches back over that line, and stop at the middle (red dot) before angling up to touch the middle of the top line of the first grid square.


start row 1 for chicken wire quilting
Then it angles down to the middle of the next grid line, 

starting row 1 for chicken wire quilting


and continues straight on that line to the next grid intersection.


chicken wire quilting


And straight back up it goes, doubling the stitching and looking just like the twist in real chicken wire, before angling again into the next grid square. Repeating the same sequence of stitching lines all the way across within the grid forms the first row of stitching.

completed row 1 for chicken wire quilting

The next row starts with the peak of the design, and is offset by half the grid square. Work either from the right to left for continuous stitching, or left to right with a new start, as shown below.


beginning of row 2 for chicken wire quilting

This offset row starts stitching at an angle to the center of the grid square, then down to the center of the grid line, doubling back to angle over to touch the straight line from the row before, at the grid intersection.


start of row 2 for chicken wire quilting

At the finish of the second row, the chicken wire design starts to take shape.


two rows of stitching to complete one row of chicken wire

Continuing the design is easy - just alternate the row 1 and row 2 stitching lines.

Here's a video, showing both rows being stitched in the a continuous line method.


Chicken Wire Scale

It's important to check the chicken wire scale to the quilt before stitching, as the open space length is more than the width in this design, and could lead to chicken wire that's bigger than expected. 

Since the size of the grid determines the width of the chicken wire, it's helpful to draw a grid in several sizes on a piece of vinyl. Then sketch in the chicken wire design, overlaying the design on the quilt to test the scale. 


chicken wire size testing
In the picture above, there's testing of a 1 1/2" width at the top, 3/4" in the middle, 1/2" below that, and finally 1" at the very bottom. 

On my test, the 1/2" chicken wire fits the scale of the chicks and would certainly hold them in, but it's too small a the scale for the rest of the quilt. Three-fourths was still too small, but 1" works fine as a scale to fit both the chicks and the rest of the quilt.


Who Rules the Roost quilt quilting by QuiltFabrication

And that's all there is to finding a grid size for chicken wire that fits with the quilt.

Wasn't that easy? Now all those barnyard quilts can be full of chicken wire - have fun quilting!


Follow on Bloglovin

My Favorite Patterns

Friday, January 24, 2020

Who Rules the Roost?

The chicken coop is full of activity, but who really rules the roost?

Who Rules the Roost wall hanging by QuiltFabrication

Is it the cocky rooster? The cute and fluffy chicks? Or maybe the jealous hen eyeing those eggs? I'll leave the decision up to wise owl, who's a curious observer of this chicken coop!

This wall hanging is my personal Round Robin quilt, made only by me at the same time as five of us worked on each other's RR quilts. The inspiration? Two of these rooster panels, which were probably meant to make a pillow.


rooster panel for the start of the quilt

One went with a lot of fabric for the group to work on, and one stayed with me. I'll show the group quilt next month - the guild members get to see it first. 

Our rounds were easy enough, with a choice between two blocks for each round. Being me, I did both blocks in each round:

1st - pinwheel or something from nature
        pinwheel barn quilt, and rooster panel

2nd - quilter's choice
           red checked border

3rd - flying geese or four patch
          chicken tracks, and greenery of the tree

4th - snowball or log cabin
             who rules the roost sign, and tree trunk

And what fun I had creating within those parameters! Of course, all of that scenery needs custom quilting - time to play again!

The tree got leaves, the sky clouds, and the trunk bark.


leaf and cloud quilting on the Who Rules the Roost quilt

See my little owl? I bought a whole quarter of a yard just for him. And if I could have found squirrels or foxes in the right scale, I would have added those too. I was lucky enough to have a baby print in the stash with the little chicks on it to add to the open space in the coop.


background and chicken wire quilting on the Who Rules the Roost quilt

They're held in by chicken wire, though they could probably escape if they wanted to! Needing just a quick refresher from my chicken wire tutorial, the design was pretty easy to quilt. Next week, I'll have another chicken wire quilting tutorial, this time with video!

Notice there's quilting behind that chicken wire? I thought it better to make the background all the same, then add chicken wire on top in just one area.


background quilting on the Who Rules the Roost quilt

And then the barn, with it's quilted doors, using jump stitches to speed up the quilting of all those lines.


barn door quilting on the Who Rules the Roost quilt

Final quilting touches include wood grain in the sign and on coop parts, bark in the tree trunk, and a horizontal stipple around the chicken tracks.

One last touch - the binding. Sky blue, green, and red bind this quilt, with seams to match the piecing. Check out the tutorials for straight seam matching, as seen at the sky and tree,


matching binding to the piecing by QuiltFabrication

and matched angled binding, as seen at the bottom of the sign.

I'm thrilled with how this turned out, and can't wait to hang it up - it will be in good company with my other rooster, Fred, the Fugitive!


Fred the Fugitive rooster quilt

Have a great weekend, and I'll see you next week with more to crow about!


Follow on Bloglovin

My Favorite Patterns

Monday, January 20, 2020

Frosty Lace

Welcome to my day of the Winter Blue Blog Hop, hosted by Carla of Creatin' In the Sticks. My creation, Frosty Lace, is sure to chase away those winter blues!

Frosty Lace wall hanging by QuiltFabrication

I'll admit that I struggled with an idea for this hop till well after Christmas. While bargain shopping, I spied a flower spray on a gift card and finally felt some inspiration.


petal spray for Frosty Lace quilt


Reworking it a bit to come up with the design above, I started playing in EQ8 by showcasing that idea in half circles in the border. And then a funny thing happened - I don't know exactly what I did, maybe a re-size, but EQ burped and gave my design wings. 


EQ design burp

Wow! Love it, but is it sew-able? With a few seam changes here and there, I determined it was very sew-able. Yeah! After re-positioning my inspirational motifs, I kept designing, adding a center 'snowflake', enlarging bits here and there, and sending pics to my son for critique. He suggested the four sharp seeds in the center outside be larger, then I finished the design with value changes. More Wow!


Frosty Lace quilt design evolution

And I fell in love with Frosty Lace - it's lacy and delicate, with the center 'snowflake' lending a bit of frostiness. Perfect for winter in blues, it could be just as pretty in green for spring - I'm imagining flowers coming into bloom.


After all that designing, next came the sewing. After careful cutting, those curves were pinned at both ends plus the center for quarter circle blocks (aka a Drunkard's Path block). A stylus helped to pull the smaller, outer piece into alignment. 


sewing drunkard's path blocks

Treated gently, those curves just moved into position without much fuss. Though it's been a while since I've sewn curves, I enjoyed it so much that there may be a few more quilts this year that have curves. 

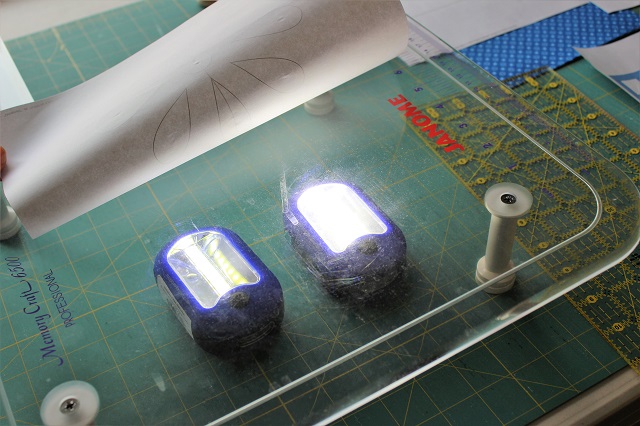
With the half and quarter circles done for the borders, I set in on the rest of the quilt, which is mostly applique. Taking a tip learned from one of my fellow bloggers, this homemade light box using flashlights and a clear sewing machine extension table worked wonderfully!


homemade light box for pattern transfer


All that was left to finish for the top were 4 paper pieced units, a few more strips for borders, and the remaining appliques. Then on to the quilting! 

This 46" x 46" wall quilt begged for custom treatment, and is certainly full of beautiful designs to set off the applique - enjoy the eye candy!

The Frosty Lace overall texture:


Frosty Lace quilt quilting texture


a border corner:


Frosty Lace quilted border corner


detail of the plume around the circles (that was a bit of thinking outside the box):

Frosty Lace quilt corner plume


a border center, showcasing the petal motif:

Frosty Lace quilt border center quilting


the same showcasing design repeated around the petal motifs in the quilt center:

Frosty Lace center quilting


and finally, the center. Notice all of the quarter inch stitching is outside the applique.


Frosty Lace quilt center


Enjoy the rest of the hop, and chase away those winter blues with quilting!


Follow on Bloglovin

My Favorite Patterns

Monday, January 13, 2020

Jump Stitch Quilting

Want to alleviate the tedium of pulling threads to the top at every start, when the next start is just stitches away? Want to make stitching a quilting design more efficient? Then try jump stitch quilting!


jump stitches used in quilting

For owners of embroidery machines, this should be familiar.
Digitized designs employ 'jump stitches' to get from one area to another in a design. Sometimes the design uses stitches, but most of the time it's a jump stitch. That's un-stitched thread between different design areas, with lock stitches at each end.

In this picture from Brother, USA, the circled areas show how jump stitches are used in this embroidered design. 


brother usa embroidery jump stitches


I'm all about efficiency, so the jump stitch concept really came in handy yesterday when I was quilting overlapping lines. It was far easier to make jump stitches with lock stitches at each end, than to clip threads and start again pulling up and holding threads.

Below shows stitching up to the line, adding lock stitching at the line, then jumping over and restarting, with lock stitches, on the other side.

lock stitches after a jump stitch

Then it's easy to continue the design, 

stitching continued after a jump stitch

and repeat the process in the other direction, creating two jump stitches over the previous quilting.

jump stitches within a design

Since each end is locked, those jump stitches can now be trimmed away, on the front and the back.

removed jump stitches

My design also required some straight lines behind these crossed bars, which meant more jump stitches. Because they're so flat, they're hard to see - just follow the white arrows, which shows half of them.

numerous jump stitches

After stitching, they're all clipped to clean up the design.

clipped jump stitches

And what a time saver! This was so much easier than locking, clipping the threads, moving to the new area, pulling up threads, and locking, just to stitch a few stitches. I could have backtracked to stitch this design, but one thread pass looks much nicer.

So, that's my tip for today - make use of jump stitches in a quilting design to get the needle where it needs to be, and to make more efficient use of quilting time.

Happy Quilting!

Follow on Bloglovin

Thank you for following!