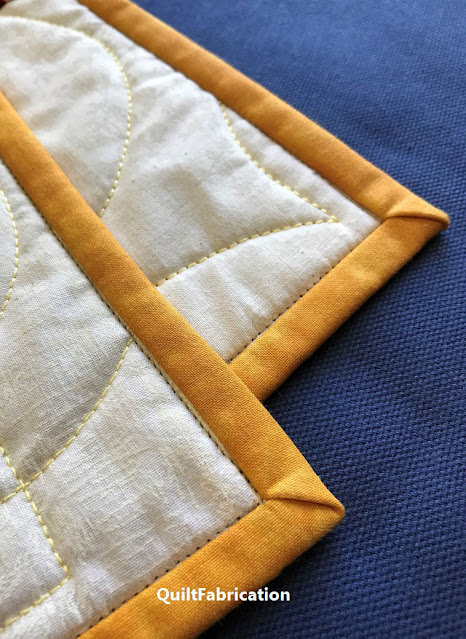
All that's needed is a simple change in stitching the binding at the corner, a snipping of a bit of fabric, and that corner binding will fold nicely, making flat, beautiful quilt corners!
I learned this fabulous binding trick several years ago, and it's how I finish all of my binding corners. I've demonstrated this technique several times to members of my guild, most recently via a Zoom meeting. After several quilters tried it, many raved and excitedly thanked me for sharing how easy it is to now make beautiful corners - this corner binding trick is certainly all the rage!
Having recently posted my favorite binding tutorials, in the written-with-photos form, I thought of an even better way to share them: by making a video! With a video, it's more than a front row seat - it's the opportunity to see exactly how I'm demonstrating the technique, right on my own quilts. How awesome is that??
Have a look at the first video in the binding series, How to Reduce Bulky Quilt Corners - Step by Step. It's full of up close, detailed video footage showing how to sew the binding at the corner, and clipping the excess fabric. Just check out those beautiful flat corners in the picture!
I'm excited to bring my tutorials to video, to share with everyone quilting techniques that not only save time and frustration, but to also show new or different methods to advance everyone's quilting skills.
And now it's time to share! Here's the link to How to Reduce Bulky Quilt Corners - Step by Step video! Feel free to share this with your quilt friends, and please consider subscribing to my YouTube channel. There's more quilting tutorials I plan to share!
Happy Quilting!

My Favorite Patterns


Great video on less bulky corners...thanks so much for sharing...Hugs Julierose
ReplyDeleteA couple weeks ago I saw someone show this method and I can't remember who. I used it and love it, especially on small projects.
ReplyDeleteWhat an awesome video, thank you for sharing!
ReplyDeleteNice little video and terrific hint (and Tips/Tutes is still open if you like!).
ReplyDeleteThanks for a great tip! I'm going to be doing this from now on.
ReplyDeleteThanks, Susan, I did try this right after you posted the binding tutorials, but the video does make it clearer where to cut the triangle out. I also used your method of joining the binding ends which was simpler than the method I had been using.
ReplyDeletePat
Loved this.
ReplyDeleteThis is awesome, Susan -- thanks for sharing! I did run across this technique once before and tried it and it worked really, really well -- but then I forgot how to do it and couldn't find where I'd seen it or read about it before, so back to bulky corners. :-(. Now I'm bookmarking your tutorial so I can find it when (IF!) I ever get another quilt finished instead of constantly starting new ones all the time...
ReplyDeleteBrilliant, Susan (and terrifying!!) It would be my luck that I would cut something important. Like the quilt top!
ReplyDeleteI needed this before I sewed those two bindings on today. LOL! Wonderful video, thank you so much!
ReplyDeleteMarvellous! Pinned to my tips and tricks pinterest board so I can find it again! Thanks for linking to the Chameleon's Colour & Inspiration party. :)
ReplyDeleteI'm following you YouTube channel now. A friend showed me this trick. I think she learned it from Ricky Tims. I should get back to doing it!
ReplyDeleteGreat video, thank you for sharing!
ReplyDeleteThanks for the tip. I trim but on the other side, and it doesn't always work. I'm definitely going to try this.
ReplyDeleteThis comment has been removed by a blog administrator.
ReplyDelete