I'm so excited that I finally got to share my long-dreamed-of Snowflake runner yesterday. Just look at those snowflakes - they came out even better than I could have imagined!
A large portion to the success of this Snowflake runner is owed to a fusible web product called Flexi-Fuse (affiliate link). I had ordered both a Flexi Fuse pack of 10 (affiliate link) plus a pack of 25 (affiliate link) several months ago, but hadn't tried it yet. This was the perfect project for testing.
For starters, I would put the fusible 'weight' at around a light to medium, with good adherence to the backing paper. Some fusibles fall off the backing easily, but this is not one of those. The fusible itself has a nice grid/weave feel to it, giving me confidence that my appliques will stick.Another reason I chose this product was because of the convenient 8" x 10.5" sized sheets. It dawned on me I could print my snowflake outlines, eliminating the tracing work.
Unfortunately, nowhere on the package does the product say it can go through a printer. But hey, I was willing to try, even if it meant sacrificing a sheet.
Usually I'm wary of putting items, such as a fusible sheet or freezer paper, through my printer. To get around that issue, I'll tape a regular piece of paper to protect the fusible sheet or to cover the slick freezer paper.
Using small pieces of tape along the top of the paper edge which feeds into the printer, it provides protection for the fusible, or gives the printer something to grip instead of slippery freezer paper.
Something that I noticed when taping - the Flexi Fuse sheet is 8" wide. To make sure my snowflakes printed in the 8" space, I made sure the Flexi Fuse sheet was centered on the paper for printing. I could have ordered the Flexi Fuse Roll (affiliate link) and cut my own sheets to size, but these sheets are much more convenient. It certainly pays to check the width of fusible printer sheets before printing a project.
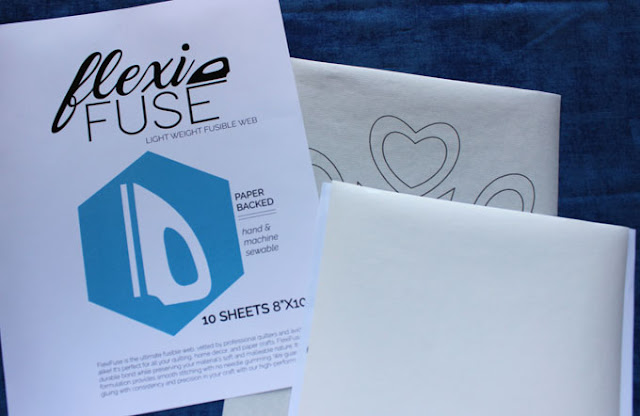
In the picture below, the Flexi Fuse sheet is centered and taped to paper, ready for printing. Behind it is a snowflake printed out on Flexi Fuse.
The instructions for ironing the fusible sheet to fabric are easy and straightforward. Cutting out the snowflake shapes was also easy - the fusible stayed on both the fabric and the paper, and no loose threads or fuzz along the edge.
Just as easy was fusing the snowflakes to the background fabric - no damp press cloth required! Check out the clean edges and no gumming up on the needle.
As for the final hand the appliques have, I'd say soft, especially since no excess Flexi Fuse was cut out from the snowflakes. Every single bit of white is completely fused to the background. It's certainly a nice feel!
I'm glad I finally got to test Flexi Fuse, especially with these snowflakes, and I'm looking forward to using it again.
Happy Quilting!

My Favorite Patterns


Thank you so much - I am going to do a Halloween quilt - paper doll pattern and appliquéing costumes my daughter wore. So princess, pirate girl, mermaid, the usual. But the other webs I had were too stiff to make layers. Looks like this product will do it!
ReplyDeleteIt’s beautiful and nice to read such a detailed review. Thank you.
ReplyDeleteGood to know - thanks!
ReplyDeleteOh my goodness, you are beyond brilliant!!!! I can't wait to try this! So simple and yet sounds like it works so well. Thanks bunches for the tip!
ReplyDeleteThank for linking up this review. It is so helpful for people to have good information on tools like these!
ReplyDeleteThis comment has been removed by a blog administrator.
ReplyDeleteThank you for reviewing our fusible web! Such great tips for self-printing, and a beautiful pattern shown!
ReplyDeleteFor readers out there, we recommend only using an inkjet printer (NO laser printers) to prevent fusible from heat-bonding inside of your printer. Susan's paper trick sures up any unease about glitches like that, though, so THANK YOU!
Would love to hear any and all of your success stories about printing on our fusible or otherwise...Happy quilting!