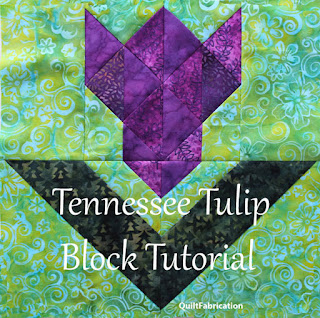
The EQ folks running the Block Base Plus Sew Along released block #4 this week, the Tennessee Tulip, also known by it's unflattering Brackman ID number, 785.7.
This week's Block Base+ post features search and printing options, so we can all learn about more about the program. I found the printing information especially interesting, learning that this particular block may be easier to piece using both the rotary cutting chart and templates. I also discovered that for cutting purposes, Block Base+ assesses the position of a triangle within the block to avoid having the bias along the block edge. Hmm, all good things to think about when trying to figure out how to piece the Tennessee Tulip.
Now, I personally, am not concerned about the bias on the block edge. I've made many blocks which have a bias edge, treating those seams gently, without stretching, especially if I have to take out stitches. With a bias edge limitation removed, I'll demonstrate how to piece this block with the stitch-n-flip method, just like for Block 2 Magic Cross and Block 3 Jacknife.
The following Tennessee Tulip block tutorial makes a 12.5" x 12.5" block, which is 12" x 12" finished. I recommend printing the color block image from Block Base+ (no affiliation),
and the block with labeled pieces, as they are used for reference in making this block.
Since I'm providing all the cutting sizes in this tutorial for a finished 12" block, there's no need to print the rotary cutting chart or template pieces. Just keep in mind that if you make the block some other size, you'll need to print those.
Colors and values that I used in my block are bright green (background), dark green, dark purple, medium purple, and a medium purple print.
And here's the color coded chart for all those triangles cut from the three purple fabrics. It follows the orange values from Block Base+, and will be helpful when laying out this part of the block.
Tennessee Tulip Block or Block #785.7 Tutorial
Materials for a 12" finished block
A -- 2 (two) 6.5" X 3.5" rectangles, background
B -- 1 (one) 3" square, background 1 (one) 3" square, dark purple, #1
2 (two) 3" squares, medium purple, #2
2 (two) 3" squares, medium purple print, #3
C -- 1 (one) 7" square, background
D -- 1 (one) 7" square, dark green
E -- 2 (two) 3.5" squares, background
F -- 1 (one) 2 3/8" square, medium purple, #2
1 (one) 2 3/8" square, medium purple print, #3
G,H -- 2 (two) 3 7/8" x 2" rectangles, background
Make the C/D/E/F units
Mark a diagonal line on 7" square C. Place right sides together with 7" square D.
Stitch a 1/4" seam on each side of the line.
Cut on the line to make 2 (two) half square triangles. Trim each to 6.5" square.
Draw a diagonal line on each 3.5" background square. Place on the corners of each D triangle.
Stitch on the line. Trim excess.
Press one seam toward the dark green and the other toward the background. This is for nesting when stitching the units together.
To complete the lower two units of the Tennessee Tulip block, cut each F 2 3/8" medium purple (#2) and medium purple print (#3) square on the diagonal.
On the backside of a triangle from each color, draw a diagonal line 1/4" from the cut diagonal.
Place the medium purple print (#3) on the left unit, and the medium purple (#2) on the right unit, aligning the marked line with the edges of piece E.
Stitch on the line. Flip F pieces over to check coverage of the E corner, re-stitching if necessary.
Trim excess, pressing seams in opposite directions for nesting. Final C/D/E/F units should measure 6.5" square.
Make the Bottom of the Tulip
On the 3 7/8" x 2" background pieces G and H, make a mark on opposite edges
1 7/8" from the bottom. Align a ruler with mark and opposite point to cut a 45 degree angled cut, as shown on piece G below.
Pair up the remaining medium purple (#2) F triangle with G, and the medium purple print (#3) with H.
Stitch together, making new triangles.
Make the Tulip Body
Cut all 6 (six) 3" B squares on the diagonal.
Follow color-coded numbered tulip diagram to layout the triangles.
#1 -- dark purple
#2 -- medium purple
#3 -- medium purple print
Stitch dark purple #1's to the triangle next to them, making half square triangles.
Add the triangles to the left and right, making two strips of triangles.
Stitch each background triangle to the remaining purple triangles.
Stitch those triangle units to the strips of triangles.
Stitch G/F and H/F units to triangle strips.
Add 6.5" x 3.5" background rectangles to each side. Units measure 6.5" square.
Final Tennessee Tulip Block Assembly
Stitch the upper tulip units together, and the lower leaf units. Press seams open.
Stitch top and bottom units together. Press seam open.
And ta-da! A 12" finished Tennessee Tulip block!
I hope you've enjoyed this little tutorial, seeing how easy this block is to put together once it's broken into parts. Send me pics if you make one using my tutorial!
Happy Quilting!
Enjoyed this post? Don't miss out - get posts delivered directly to your inbox with follow.it.

My Favorite Patterns


You really do a great tutorial! I get the emails on EQ8 - just need to get with it!
ReplyDeleteIt is beautiful and your tutorial is excellent.
ReplyDeleteOh this one is so pretty!!
ReplyDeleteLovely tulip, and thanks for the great and useful tutorial!
ReplyDeleteI have been too busy to follow along with the Blockbase sew along but I do love your tulip block today!
ReplyDelete