Wednesday, June 30, 2021

Midweek Makers 286

Welcome to Midweek Makers! Happy Fourth of July - stay safe this weekend!


This is my last week to gush over red, white and blue - I'm sorry, I just can't get enough! I'm loving my newest additions to my decor, the Patriot runner


and the Liberty wall hangingEverything will remain out until the end of July, then I'll have wait till next year to fulfill my passion. How sad :(


Though most don't share my enthusiasm for red, white, and blue, there were a couple of quilts featuring those colors last week.

From DonnaleeQ, this quick little charity quilt,


and from Chopin - A Passionate Quilter, this simple beauty.


Now it's your turn - what have you been up to?

  • please link directly to your post not your homepage
  • please link a quilt related project
  • visit with the others and spread some comment love
Have fun!


Follow on Bloglovin

You are invited to the Inlinkz link party!

Click here to enter

Monday, June 28, 2021

Liberty

Since I was a little kid, I've always been fascinated by the Statue of Liberty, finally visiting her a few years ago. And she did not disappoint! With that in mind, I'd like to introduce another wall hanging to add to my patriotic collection - Liberty.

patriotic print with aqua, blue, and red striped fabrics


The final version did end up slightly different than the in-progress picture from last week, with the removal of the smaller HST's at the edges.

aqua, blue, and patriotic fabrics laid out

As I said, I certainly didn't set out to make another patriotic wall hanging pattern when I started playing with the new half square triangle dies from Crafters Edge. Guess I was having too much fun cutting and sewing HST's as these dies make perfect HST's.

triangle dies for a fabric cutting machine

These new HST dies should be available soon, but in the meantime, you can get your hands on a brand new Crafters Edge Crossover II cutting machine at 25% off during the whole month of July - that's an awesome sale!

After playing with different settings for my dark blue and light aqua HST blocks, I pulled out one of the numerous patriotic prints from my stash - bingo! The ideas for a new patriotic wall hanging started taking shape, and in a day or so, Liberty was born.

Finished Liberty came out to be the perfect size for an alcove near my front door, measuring in around 38" x 38". It looks as if that spot was made for her - love it!


dark blue, aqua, red/white stripes and a patriotic print surround the Statue of Liberty


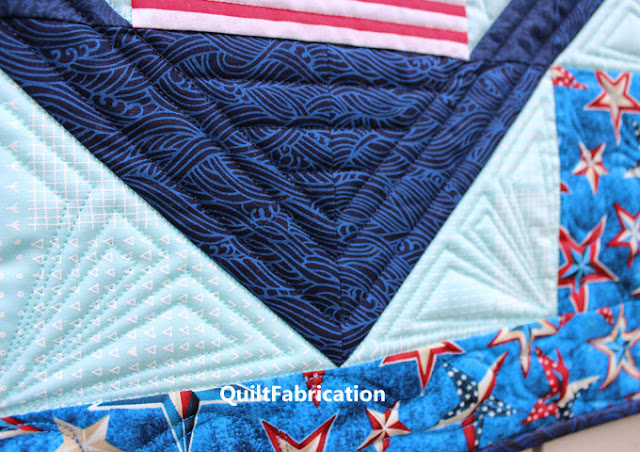
Can you tell I had a great time quilting Liberty? Stitching some art deco style quilting in the aqua triangles, reminiscent of the Empire State Building, adds an additional New York reference.

three triangles quilted in an aqua triangle


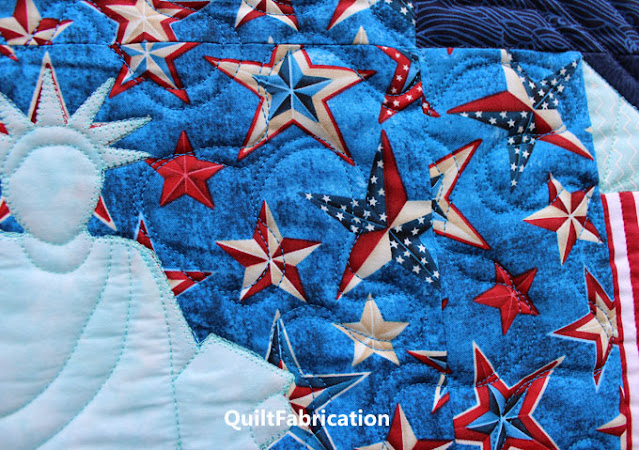
Straight lines at various angles add interest to the dark blue areas, and celebratory ribbon quilting accents the patriotic print.

ribbon quilting


As for Liberty herself, I added a few simple lines to give shape to her face, crown, and robe. Those quilting detail lines are included in the pattern.

statue of Liberty quilted


With a few HST's (die cutter not necessary), a couple rectangles and squares, plus a grand applique, Liberty can honor your wall too. From now until July 5, the Liberty wall hanging pattern is available at a special Fourth of July sale price - take advantage of this special sale while you can!

Happy Fourth of July!


Follow on Bloglovin

Enjoyed this post? Don't miss out - get posts delivered directly to your inbox with follow.it.  

           
GET POSTS BY EMAIL


My Favorite Patterns

Friday, June 25, 2021

Fairy Tale Castle

Welcome to my fairy tale Castle!

a portion of a grey castle


Yes, I'm participating in the Fairy Tale Blog Hop, hosted by Joan of Moosestash Quilting - thank you to Joan for hosting, and to you, dear reader, for visiting!

castle image and an open book


The full list of all the Fairy Tale hop participants can be found at MooseStash Quilting. These are today's participants - be sure to visit to see what they created for the fairy tale theme.

My Bumbleberry Life

Songbird Designs

Words & Stitches

MooseStashQuilting


Now let's go check out my Castle!

Growing up, I was enchanted by the fairy tales of Cinderella, Snow White, Sleeping Beauty, and Rapunzel. Besides the narrative featuring women, when I think about these tales, a common feature emerges: that of the castle.

Of course, at the time these fairy tales were written, castles were a pretty common part of the landscape. They were, after all, large, fortified buildings housing members of one's family (think kings or nobility) or a larger community, against attack. They were essentially homes.

My Castle block is not fairy tale specific. It features some of the important parts of a castle, such as a tower, a gate, crenellations (the blocks on the tower and above the gate), and really wide arrow loops that look more like windows. I can so envision Rapunzel letting down her hair from that tower on the right!


Though it's still a block at the moment, I have plans to use it in a quilt late this year or early next. And if the spirit moves me, I may design more fairy tale blocks to go with it - we shall see.

The Castle quilt block is now available in my QuiltFabrication Etsy shop - enjoy!

For new visitors, feel free to sign up for email delivery of posts via follow.it. Just fill out the sign up form below to receive quilty goodness!


GET POSTS BY EMAIL

Happy Quilting!


My Favorite Patterns

Wednesday, June 23, 2021

Midweek Makers 285

Welcome to Midweek Makers - the place to share your quilt projects, in-progress or finished. Either way, we want to see!

My share this week is an in-progress project.

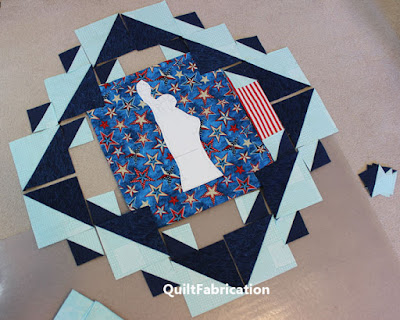
navy aqua blocks with statue of liberty

Yes, I've inadvertently gone down the path toward a patriotic wall hanging, though I certainly didn't intend to. I think the seed was planted last Tuesday, after decorating the house with my red, white and blue table runners and quilts. It was then that I realized that Fireworks is my lone patriotic wall hanging. Someday I'll have to fix that. 

A few days later, I started testing some new HST dies sent to me by Crafters Edge. Randomly pulling out navy blue and light aqua fabrics, I just started cutting three different sizes of triangles, making about a dozen HST's of each size. 

navy blue and aqua half square triangles


I played with a few different layouts, tucking some away for future development, as there wasn't enough fabric to finish them. Then it happened. I pulled out that blue star print and headed down the patriotic path. The first picture above is testing a layout, with the final top probably a bit different due to fabric constraints - again. Once I get it all worked out, I'll have a new wall hanging to share - stay tuned!

Though my project is in-progress, I'm showcasing some finishes seen at last week's party.

From I-Completely Without Makeup, this very refreshing hexie flower table runner,


Grace and Peace Quilting showed off her finished glam-clam quilt-along projects,


and Quilting Gail quilted different fills in this Paintbrush Studio panel - how cute is that?


 Now it's your turn - come share!

  • please link directly to your post not your homepage
  • please link a quilt related item
  • visit the others and send some quilt love
Have fun!


Follow on Bloglovin

You are invited to the Inlinkz link party!

Click here to enter

Monday, June 21, 2021

FREE State Quilt Blocks (43-47)

Come tour with me around the United States, virtually of course, and collect another five FREE state blocks!

quilt blocks in green around a US map


We left off with block 42 in South Carolina, and with a short hop, we'll go to Tennessee with block 43, compliments of Dragonfly's Quilting Design Studio.


From there, we'll swing back toward Alabama, with block 44, a camellia themed block from Katie Mae Quilts.

pink quilt block


Continuing a tour of the southern states, next we'll visit Mississippi, with block 45 from Traditional Primitives


Then a short jump puts us in Louisiana, with block 46 from Wendt Quilting.


And going north, we finish in Arkansas, with block 47 from Blue Bear Quilts.


If you've missed any of the previous blocks, I can help catch you up. Just visit these previous posts, complete with pictures and links, to fill in the map.

Keeping Up with the Free USA blocks (1-9)

More Free USA Quilt Blocks (10-14)

More Free US State Quilt Blocks (15-20)

More Free US State Quilt Blocks (21-30)

Maine Pine Tree State (31-35)

More Free US State Quilt Blocks (36-42)


It's been an amazing year of touring, with just 5 more US state blocks to go. And the block collecting fun will continue with a new series, Sew Much Fun, starting August 1. See you then!

Happy Quilting!


Follow on Bloglovin

My Favorite Patterns

Friday, June 18, 2021

Die Cutting Hints and Tricks

Today I'm sharing a few hints and tricks that I've learned in die cutting, using the Crossover II machine from Crafters Edge

die cut white star

I had the machine and several dies for a few months now, enjoying the system for cutting accurate shapes. That star seen above was certainly quick and easy!

As a newbie, here's a few things I've learned about die cutting which I hope will help you when you get your machine.


1. Apply fusible to the fabric first

I've made three projects that require fusing, and on each and every one, I forgot to apply the fusible before cutting. You'd think I'd have learned after the first or even second time!

My excuse for the first omission is the excitement over cutting with a new quilting gadget. How fun to make a fabric/die sandwich, wind it through the rollers, and pop out a perfectly cut shape on the other side! 

Sounds silly I know, but I'm one of those who finds joy in the simplest of things. Which makes it totally understandable as to why I forgot the fusible.

To rectify my problem, it seems easy enough to just cut the fusible with the die. 

die cutting two nested stars


It's great that the star sizes nested, leaving just enough fusible for a wide star outline. That way I don't have one big fused and stiff star. And it looks like it cut great, right?

die cut star from fusible web


Well, sort of. I wouldn't say that it was cut all the way through as I had to use the scissor to get it free. Either it's the nature of fusible web, or I just needed more pressure from the rollers - at this point it was close enough.

Ultimately though, I had a nice star outline which fit perfectly onto my fabric star. Problem solved - this time.

die cut star outline


2. Do not stack fusible sheets then cut them with the die machine 

This was snafu #2. Once again, I'd forgotten to put the fusible on several circles I was cutting. Being the queen of efficiency, stacking and cutting fusible web, seemed like a great idea. Just look at all those layers the arrow is pointing to - one cut and done!

layers of fusible web for die cutting


Turns out that the pressure the rollers pressed all of the fusible layers together, making it a painstakingly slow process to get the layers apart. I was lucky if I got them apart in a complete piece.

So much for that idea, which goes back to the first point - apply fusible first.


3. Do not die cut batting

Unless you want felt, the pressure from the rollers will crush any poof in that batting. 'Nuff said.


4. Use tape for fussy cutting

Notice in the picture above I'm using two circles, which will cut out a ring and an inner circle. When the ring has to be perfect all around, use a piece of tape to hold the two dies in place. The tape is hard to see, but it's in that black circle.

fussy cut circles


I used this technique when cutting out a window frame,

tape holding circle dies in place


to fuse to my beach house.

pink beach house with circle window


5. Adjust the roller pressure or remove a fabric layer

One piece of fabric needs different pressure (usually less) than several layers. Too much, and you'll find the sheet metal piece getting deep groves in it, not to mention how much harder it is to crank the sandwich through the rollers.

And there's also the fabric thickness too consider. The pressure that had been working well for a stack of five fabrics may need adjustment with a new stack due to either thinner or heavier fabric.

I found that out when cutting the leopard prints for Sheba. One or two fabrics were thick, making the first cut unsuccessful. Removing a fabric layer helped more than changing the pressure. And the die was easy to replace in the same spot as usually there were heavy indents in the fabric that the die fell back into. Not all was lost!

fabric on a tray for die cutting


5. Place the die at a slight angle with the rollers

The whole die sandwich has an easier time going through if the die is at a bit of an angle to the rollers. It gives those rollers a chance to gradually move along the die edge versus butting right up against it, like hitting a speed bump.

fabric ready for die cutting


6. Support long strips

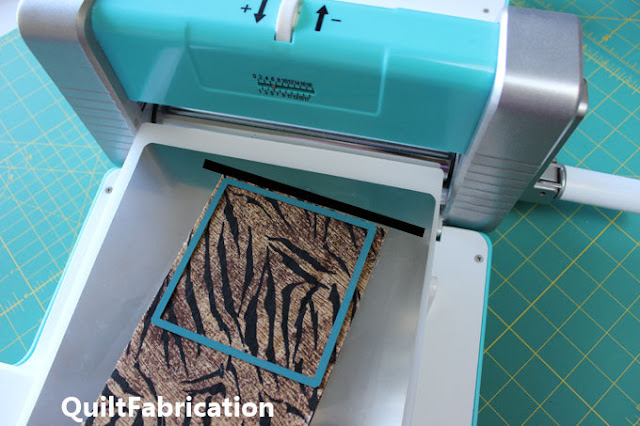
There are times when it makes for better fabric usage to cut from a long strip. I did this when cutting triangles, turning the die for each cut to conserve fabric. Just be sure that the bulk of the strip is supported off the cutting surface. Otherwise, it wants to slide off. The strip in the photo is on the short side, but you'll understand the point when there's a 15-20 inch tail.

fabric strip ready for die cutting


Phew! I've reached the end of my list of what I've learned so far about using a die cutting machine, and I hope you find this useful. I'll admit I'm having a lot of fun creating projects from the various Crafters Edge dies, so be prepared to see more in the next few months.

Happy Quilting!


Follow on Bloglovin

Enjoyed this post? Don't miss out - get posts delivered directly to your inbox with follow.it.  

           
GET POSTS BY EMAIL


My Favorite Patterns

Wednesday, June 16, 2021

Midweek Makers 284

Welcome to this week's Midweek Makers - let's do some sharing!


My share is from Deb, who was busy last week making her version of my Fireworks wall hanging. She sent me a picture of the top, with the fireworks absolutely popping! Doesn't this put you in the mood for the Fourth of July?

three red white and blue fireworks bursts


And that's it for patriotic quilts this week. Let's see these beautiful finishes:

from Melva Loves Scraps, her Pieces of the Santa Fe Trail,


and from Viridian's Blog, this Nearly Insane finish.


What's your share this week? Come link up!

  • please link directly to your post not your home page
  • please link a quilt related project
  • visit with the others and leave some quilt love

Happy Quilting!


Follow on Bloglovin

You are invited to the Inlinkz link party!

Click here to enter