Happy Pi Day! I'm celebrating 3.14 with some delicious Lattice Fruit Pie Trivets and a free tutorial to make your own!
Ready to make some? Then grab the following ingredients and let's make a pie!
Lattice Fruit Pie Trivet Ingredients
Makes 2 pie trivets
- 1/4 yard fruit themed cotton prints
- 1/4 yard insul-fleece (the one with the metal sandwiched between fleece)
- 1/4 yard all cotton batting
- 1/4 yard backing (I used beige, a 'crust' color)
- 1 1/2 yard (or 1 pkg) medium or .5 inch beige ric rac
- 1 1/2 yard (or 1 pkg) 5/8" wide beige double fold bias tape
- 1 new, sharp, size 14 needle
Step 1 - Cut circles
Step 2 - Layer the pie
Step 3 - Baste
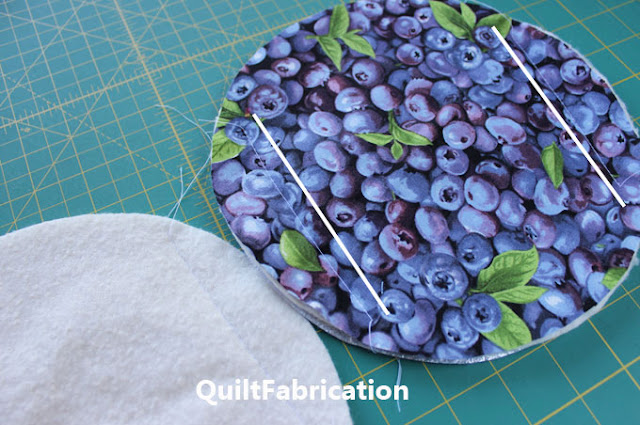
To keep layers from shifting, use a long stitch length to baste circles together, with a line parallel on two sides, as shown next to white lines. Baste a group of 2 circles and a group of 3 circles,
then baste all 5 together. Finish the basting by stitching close to the circle edge.
Remove straight line basting stitches before proceeding to Step 4.
Step 4 - Add lattice
Cut bias tape lattice strips for the center and each side, 6 (six) pieces total. Stitch in place using a zig zag stitch and thread to match the 'crust'. Trim lattice ends even with circle edge when done.
Easy lattice:
Add bias tape lattice strips in the center and on each side. Add the remaining three lattice strips perpendicular to the first set.
If weaving the lattice strips, cut all six bias strip pieces, weaving them over and under each other. Start stitching with the 'under' center piece, keeping pieces that go on top folded back out of the way. Continue stitching any 'under' strips to achieve the woven effect.
Step 5 - Apply bias binding
Step 6 - Apply ric rac to front
Using a longer straight stitch, around 3.5-4, stitch ric rac to the front, covering the inside binding edge and ric rac extending slightly over trivet edge. Fold back the meeting ends for a clean finish.Step 7 - Enjoy some Pie!
Happy Quilting!


Ohh, these are too cute and look so yummy!
ReplyDeletethat is cute. I have that old ruler. Doesn't one wonder who came up with all these different "days" and "why"!!
ReplyDeleteThese are so very cute, Susan!! Love the use of the ric rac - makes a great crust!!
ReplyDeleteFun recipe for two yummy pies! They both look lovely.
ReplyDeleteThank you for sharing such cute items, and linking up!
Last time you posted this I wanted to do it....and I still do! One of these days I will. It is adorable.
ReplyDelete